 Skip to main content
Baby Care & Parenting Blogs

Best Alternative Activities to Tummy Time for Baby's Deve...
Being a new parent is full of firsts, and tummy time is often one of the earliest baby milestones everyone talks about. But what if your baby doesn't like it? What if every attempt at baby tummy time ends in cries and protests? Don't worry, you're not alone. And the good news? There are plenty of tummy time alternatives that can support your baby's development in fun, gentle ways.
Let's explore some of the best options that are just as beneficial (and sometimes more enjoyable) for your little one.
Why Some Babies Dislike Tummy Time
Before we dive into the alternatives, it helps to understand why some babies push back during baby tummy time. It's a new position for them. Their neck and shoulder muscles are still developing, and being placed on their tummy might feel strange or even frustrating. Some babies simply prefer to see the world around them, not face down on a mat. It’s okay and you don't have to force it. The goal is to help your baby build those same skills in other creative ways.

Lap Time Exercises
One of the simplest tummy time alternatives is placing your baby face-down across your lap. Gently rub their back or sing to keep them calm. This position helps them lift their head and strengthen their neck without feeling completely on the floor. It's a great bonding moment too.
Babywearing for Muscle Development
Yes, carrying your baby in a sling or wrap can help with development too! When your baby is upright against your chest, they're naturally working on head control and core strength. Plus, they get to be close to you, which they love. This alternative is especially helpful during the early weeks when babies want to be held constantly. You're helping them grow just by wearing them.
Side-Lying Play
Not all play has to be face-down. Try placing your baby on their side with a rolled towel behind their back for support. Add a toy or mirror in front to keep them curious. Side play helps babies develop balance and eventually learn to roll. This position is comfy and gives them a new perspective on their surroundings.
Chest-to-Chest Time with Parents
Lie back on a couch or bed and place your baby's tummy down on your chest. Talk, sing, or make faces. It’s just like baby tummy time, but even better because you’re right there, keeping them comforted and close. This trick not only builds neck and upper body strength but also promotes emotional bonding.
Encouraging Rolling Over
Give your baby opportunities to roll by placing toys just out of reach or helping them gently shift from side to back and vice versa. Rolling builds the same muscles that tummy time targets and gives your baby a sense of movement and independence.
Using an Exercise Ball for Baby Strengthening
Here's a fun one! Place your baby's tummy down on a large yoga or exercise ball. Hold them securely and gently roll the ball forward and back. It's a playful activity that stimulates muscles and balance. Make sure it's slow and steady and don't forget to sing while doing it!
Supported Sitting and Upright Play
By around 3 to 4 months, many babies enjoy being in a supported sitting position. Use a nursing pillow or your arms to prop them up while playing. This helps build back and neck strength encourages interaction and gives your baby a break from floor time.
Playing on a Soft Incline
Reclined baby loungers or a folded blanket can create a soft incline where your baby isn't flat on their back or tummy. While it's not a direct replacement, it's useful for babies who need a gradual approach to floor play. You can place toys or books nearby to keep them engaged.
Water Play as an Alternative
A warm water bath (always supervised!) can be a magical time for babies to move their arms and legs freely. The water supports their body while helping muscles grow stronger. It's not just relaxing, it's developmental, too.
Try placing your baby's tummy down on your forearm in the tub for a gentle water-based tummy time alternative.
Also Read: Baby Playtime Guide
When to Introduce Tummy Time Again
If your baby previously disliked baby tummy time, don't give up forever. Keep trying in small doses. Start with just 30 seconds, then slowly increase as your baby gets stronger and more confident. Remember, the goal is quality, not quantity.
Often, once babies can roll or lift their heads better, tummy time becomes less frustrating and even fun.
Conclusion
Not every baby loves being on their tummy, and that's okay. The most important thing is to find safe, loving ways to help them grow and explore. These tummy time alternatives help build key skills while keeping your baby comfortable and happy. As a parent, trust your instincts. Every baby is different. What works for one might not work for another. The key is to be patient, present, and playful. You're doing great!

The Ultimate Guide for a Summer Trip with Your Baby
It’s a wonderful feeling to step out into the sun, baby in arms, ready to explore the big, beautiful world together. We know that travelling with babies in the summer can feel intimidating at first. The heat, the logistics involved, the packing, etc. - it is a lot to manage.
Babies react differently to heat, long car rides, changes in routine, and unfamiliar places. You may notice more crankiness, extra naps, or changes in how often your baby wants to eat and that’s okay. But with the right approach, this trip can be a heartwarming memory in the making. Let's break it down and make summer travel as easy and enjoyable as a baby's giggle.
Choosing the Right Destination
Travelling with an infant is less about checking off the most unique or exotic location. It is more about selecting a destination that feels safe and is relatively close to basic amenities such as a hospital or clean restrooms. You will want to find a place that won't be too crowded. Look for one that has good weather (slightly breezy), and travel to hills, coastal towns, or a resort with trees that provide shade. Bonus points if you can easily roll your stroller around!
Best Time to Travel in Summer
Early morning and late evening are the best times if you plan to be outside; the midday heat can be brutal for your little one. When possible, schedule your summer travel for the early summer (late March to early May in India) rather than peak June, when the heat may be intense.
Packing Essentials for a Summer Trip
Here's your simple summer baby checklist:
- Light cotton clothes
- Wide-brimmed hat
- Baby sunscreen (natural/organic preferred)
- Mosquito patches or organic repellents
- Portable fan
- Baby carrier or stroller
- Plenty of diapers, wipes, and hand sanitiser
- Favourite toy or book
- First aid kit with basic meds
- Reusable water bottles & snacks (if the baby is on solids)
Tip: Pack an extra set of clothes for yourself too, because spills happen!
Dressing Your Baby for the Heat
Cotton is your best friend. Go for loose-fitting, breathable clothes in light colours. Avoid synthetic fabrics, they can trap heat. And don't forget those tiny cotton socks if the floor's too hot.
Keeping Your Baby Hydrated and Well-Fed
Hydration is key in summer travel. If you're breastfeeding, continue as usual, it provides hydration too. For formula-fed babies, carry clean, filtered water and pre-measured formula to prepare on the go. If your baby has started solids, offer fruits like watermelon or cucumber to beat the heat.
Protecting Your Baby from the Sun
Sunburn isn't just for adults. Use baby-safe sunscreen if your child is over 6 months. Keep them under shade, umbrellas, stroller covers, or just a nice tree. A wide-brimmed hat and sunglasses (if your baby keeps them on) go a long way in travelling with baby in the sun.
Also Read: Top Summer Baby Care Essentials
Travelling by Car: Road Trip Tips with a Baby
- Install a car seat because safety first.
- Start early when it's cooler.
- Plan breaks every 1.5 to 2 hours for feeding, diaper changes, and cuddles.
- Keep a sunshade on the windows.
- Play soft music or baby rhymes—it can be calming.
Road trips can be lovely with a baby as you control the pace.
Flying with a Baby in Summer
Airports can get crowded and warm. Dress your baby in layers that can be easily removed. You can breastfeed or bottle-feed during take-off and landing to ease ear pressure. Baby carriers can help in keeping your hands free. Don't forget a few extra diapers, wipes, and a change of clothes in your carry-on.
Managing Sleep and Routine on the Go
Babies love routines. Try to stick to your regular nap and feeding schedule as much as possible. Carry a light blanket or a sleep toy from home. It brings comfort to a new place. White noise apps work wonders, too!
Dealing with Mosquitoes and Insects
Mosquitoes don't care that your baby's skin is soft and delicate, but you do. Carry organic repellents, mosquito nets, and patches. Avoid sitting outdoors during dusk. Close windows at night and check for stagnant water near your stay.
Handling Common Summer Travel Issues
- Rashes: Use talc free baby powder or rash creams.
- Dehydration: Watch for dry lips or fewer wet diapers.
- Overheating: Cool your baby down with a lukewarm wipe and shade.
Stay alert, but don't panic. Most minor issues pass with a little care.
Emergency Preparedness While Travelling
Always pack a compact first-aid kit:
- Digital thermometer
- Baby-safe fever medication (as advised by your paediatrician)
- Band-aids and antiseptic wipes
- Electrolyte solution (baby-safe)
Know the location of the nearest hospital or clinic. Keep a list of emergency contacts and your baby’s medical info (blood group, allergies, medications) handy. If your baby falls ill or gets hurt, don’t panic—assess the situation, consult local help, and call your paediatrician if needed.
Also Read: Things to Know When Flying with a Baby
Handling Parenting Stress During Summer Travel
Let’s be honest: travelling with a baby can be stressful. But it doesn’t have to take the joy out of your trip.
Here’s how to manage:
- Lower your expectations. You won’t see every sight—and that’s okay.
- Take turns with your partner for breaks or naps.
- Embrace the slow pace. Babies force you to slow down—lean into it.
- Laugh at the chaos. A diaper blowout in a resort lobby? A story for the books.
Make time for little joys—an ice cream stop, a beachside nap, or baby giggles in the pool.
Conclusion
Summer travel with your baby doesn't have to be stressful. With a little prep, you can turn it into a relaxing, heartwarming experience. You'll come back not just with photos but with stories, growth, and maybe even some new parenting confidence. So go on, pack that bag and make those summer memories.

How to Increase Your Baby's Weight in a Healthy Way?
Witnessing the development of your child is one of the most beautiful experiences of being a parent. Each roll, giggle, and achievement feels like magic. It’s normal for parents to feel a little worried if their baby isn’t gaining weight as expected. If this is you, don't worry, this is a normal feeling! You're doing great things!
Let’s look at some safe and natural ways to help your baby gain weight through healthy eating, not quick fixes. We will focus on wholesome ways of keeping babies healthy and nourished.
Is Your Baby Underweight?
First things first, not every baby is meant to be chubby. Some are naturally lean, just like adults. The best way to know if your baby is underweight is by tracking their growth using a Baby Growth Calculator. If your baby appears healthy and active and is meeting milestones, then a little weight loss is not anything to worry about. If your baby is growing slowly or seems weaker and fussier than usual, it might be a sign to pay closer attention. It is important to find safe and gentle ways to support healthy weight gain with love and care.
Breastfeeding for Healthy Weight Gain
Breast milk is the perfect food for babies, particularly in the first six months. If your baby is solely breastfed, check if she's latching correctly. And also check if she is feeding enough to load up on the calories found in hindmilk. You could also try cluster feeding or feeding more frequently.
Also, create a calm, stress-free feeding environment. Babies are sensitive to emotions and surroundings. A peaceful space, skin-to-skin contact, and your relaxed presence can improve your baby's feeding rhythm and intake. This can make a surprising difference in weight gain.
Also, don't forget to address your own needs as well- your nutrition affects your breast milk. Make sure your diet includes healthy fats, protein, and plenty of fluids. This helps keep you nourished and supports your baby’s growth too.
Must Read: Baby Feeding Chart
Formula Feeding Tips for Better Growth
If you're using the formula, choose one that's rich in essential nutrients and iron. Always follow the mixing instructions. Too much powder can harm your baby's kidneys, and too little reduces calories.
Also, feed on demand rather than strictly by the clock. Sometimes, babies just need a little extra top-up, especially during growth spurts.
Introducing High-Calorie, Nutrient-Rich Solids
Once your baby hits six months and is ready for solids, it's time to add calorie-dense, nutritious foods to their meals. Think mashed avocados, bananas, sweet potatoes, and pureed dals. Steamed and mashed moong dal with ghee is a great Indian weaning food that supports how to increase baby's weight. Homemade khichdi with vegetables and a dash of ghee is another powerhouse meal.
Healthy Fats and Dairy for Growth
Once your baby is around 8-9 months old and tolerating solids well, you can introduce healthy fats like ghee, butter (in moderation), and full-fat curd. Paneer, grated finely, can also be a delicious addition. Remember, fats help absorb fat-soluble vitamins like A, D, E, and K. These are essential for growth and immunity. Plus, babies love the taste!
Baby’s Sleep and Weight Gain
Did you know that sleep plays a key role in growth? During deep sleep, growth hormones are at work, supporting physical development and tissue repair. A well-rested baby usually eats better and digests food more easily. Poor or inconsistent sleep can sometimes affect feeding cycles and metabolism.
To support weight gain, establish a regular sleep schedule and wind-down routine. A rested baby is often a better eater and overall happier!
Frequent Small Meals and Snacks
Little tummies need little meals frequently! Offer meals every 2–3 hours. Include fruits like mashed chikoo, apple puree, and boiled potatoes with a bit of butter. Don't force-feed. Instead, offer variety and let your baby explore textures. Over time, they'll learn to enjoy food, and that makes a big difference in how to increase baby weight naturally.
Avoiding Empty Calories
While tempting, sugary snacks, biscuits, and processed foods don't help. They may fill your baby's tummy, but they lack nutrients and can lead to poor eating habits. Instead, stick to wholesome, homemade options. A mashed banana with a few drops of ghee or a soft idli with curd is much better than store-bought snacks.
Encouraging Active Play and Movement
It might sound odd, but movement helps with appetite. Babies who roll, crawl, and play often feel hungrier and eat better. Tummy time, crawling games, and gentle stretching with you can do wonders for their motor skills and boost their appetite.
Tracking Progress and Adjusting Diet
Keep a growth tracker or consult your paediatrician regularly. Every baby is unique. If you notice a plateau or slow weight gain despite your efforts, revisit your meal plans. Sometimes, a small tweak like adding an extra snack or increasing protein can make a noticeable difference in how to increase baby's weight over time.
Also Read: Baby Growth Chart for a Parent
When to Seek Medical Advice
If your baby refuses to eat, vomits frequently, has chronic diarrhoea, or shows signs of developmental delay, don't wait. Speak to a doctor to rule out any underlying issues. In some cases, nutritional deficiencies, allergies, or medical conditions may affect growth. Early intervention is always better.
Conclusion
Raising a baby is a journey full of surprises and learning. If you're concerned about how to increase baby weight, remember: there's no one-size-fits-all answer. Keep offering love, good food, and lots of cuddles. You're doing better than you think. Sometimes, all your baby needs is time, consistency, and your unwavering support. Keep going, super parent!

How to Gently Wean Your Baby Without the Tantrums?
Weaning your baby is a big milestone for both you and your baby. Whether it’s your first time or not, the transition can feel overwhelming. Moving from breastfeeding to bottle-feeding, or starting solid foods, brings a lot of emotions. For many parents, the idea of weaning raises questions such as "When do you stop breastfeeding?" and "How do I avoid tears and tantrums?"
What if we tell you that it can all be done gently? It only takes a little patience, love, and a loose plan to help you move into this transition smoothly. Let's explore how this can be done together!
When is the Right Time to Wean?
There is no easy answer to this, and every baby is unique. The World Health Organisation does recommend breastfeeding for two years, but when to stop is really a personal decision. You might notice your baby showing signs of wanting to stop nursing. They may lose interest during feedings, get easily distracted, or start sleeping longer at night.
However, it may also have to do with when you feel ready to stop. Consider the following questions: Are you ready? Is your baby showing signs of readiness? Once you answer yes to both, slowly consider when you might want to stop nursing and how to transition gently.
Gradual vs. Sudden Weaning: Which is Better?

In most cases, gradual weaning works best. It's gentler on your body and emotions and easier for your baby to accept.
Sudden weaning can lead to engorgement, discomfort, and an upset baby who feels confused. Gradual breastfeeding to bottle transition gives your little one time to adjust without stress. You can start by dropping one feed every few days or even every week, depending on how your baby reacts.
Tip: Begin with the feeding your baby is least attached to, often the midday feed, and save the bedtime feed for last.
Also Read: Everything you need know about weaning
Replacing Nursing with Other Comforts
Nursing isn't about food, it's about connection and comfort, too. So, as you reduce feeds, replace them with cuddles, songs, books, or gentle rocking.
Babies crave closeness. Cuddles, skin-to-skin time, and soft lullabies can help your baby feel safe during the weaning process.
Must Read: Baby Feeding Chart
Offering Nutritious Alternatives
As you wean, make sure your baby's nutritional needs are met with healthy alternatives. During the breastfeeding-to-bottle transition, babies under 12 months usually switch to formula. For toddlers, your paediatrician might recommend whole milk along with a balanced diet of fruits, vegetables, grains, and proteins to support their growth.
Make meals fun with colourful plates, finger foods, and baby-led options, that can keep your little one interested. The goal is to build a positive relationship with food right from the start.
Creating a New Feeding Routine
Babies thrive on routine. As you drop feeds, replace them with a predictable activity like a walk, story time, or snack.
A new schedule helps your baby know what to expect. This makes when to stop breastfeeding feel like a natural shift rather than a sudden stop.
Example: If you are usually nursing your baby right after waking, try offering breakfast first and save cuddle time for after the meal. Small shifts can make a big difference.
Handling Night Weaning Smoothly
Night feeds can be tough to give up for both of you. If your baby is waking purely out of habit (not hunger), try offering comfort in other ways. Rub their back, sing a lullaby, or offer a pacifier.
Gradually shorten how long you nurse at night or try spacing feeds further apart.
Make sure they're well-fed during the day so nighttime hunger doesn't strike.
Dealing with Resistance and Emotional Outbursts
Yes, your baby may cry. Yes, it might be hard to watch them cry. And yes, that's completely normal.
This isn't just about food change, it's an emotional change. Be there for your little one. Hold them close. Talk them through it, even if they don't understand all the words yet. Your calm voice and presence speak volumes.
And remember, tantrums aren't a sign of failure. They're just your baby's way of processing something new.
Involving Dad or Other Caregivers
Now's a great time for your partner to step in. Let Dad give the bottle or handle bedtime. Babies often respond better to someone who doesn't usually do the nursing.
Having other caregivers involved makes the breastfeeding-to-bottle transition smoother. It also helps your baby grow confident in different types of comfort and love.
Staying Consistent and Patient
The key to weaning without tantrums is consistency and patience. If you've decided to drop a feed, try not to go back. Mixed signals can confuse your baby.
But don't be too hard on yourself, either. Some days might feel like a step backwards. That's okay. It's not a race. Just keep going with love and intention.
When to Seek Help
If your baby is refusing all other forms of feeding, or losing weight, it is important that you reach out for help. Talk to a paediatrician or lactation consultant if you're experiencing physical pain or emotional distress..
Conclusion
Breastfeeding and weaning are a journey full of ups and downs. Whether you're still figuring out when to stop breastfeeding or you're ready to start tomorrow, remember this: You've got this. Do it gently, follow your instincts, and lead with love. Your baby will feel it. Take it one day at a time, and don’t be afraid to ask for support if you need it. Every step you take is part of a beautiful bond you're building with your little one.

How to Bond with Your Newborn as a Dad?
Becoming a dad is one of the most beautiful, overwhelming, and heart-changing experiences. That tiny human wrapped in a blanket? The feeling of holding them for the first time, when everything else just fades in the moment. They already know your voice, your warmth, and your love, even if they can't say it yet. It's soothing and comforting, establishing a connection from the first day together.
Traditionally, parenting advice has centered around mothers, but fathers play a powerful and distinct role right from the start. Bonding with your baby isn’t just about support, it’s about building your own relationship, your own rhythm, and your own love language with your newborn. The truth is, dads are just as important.
So, let's talk about how you, as a dad, can create a special bond with your newborn in ways that feel natural, loving, and real. Whether you're learning about parenting styles or just trusting your instincts, every moment counts.
Know the Best Parenting Styles with Your Newborn as a Dad
As a new dad, the early days with your newborn can feel overwhelming yet incredibly rewarding. Explore different parenting styles to guide you through this precious time, helping you connect deeply with your baby.

The Power of Skin-to-Skin Contact
This one's simple but powerful. Holding your baby against your bare chest helps regulate their temperature, heart rate, and breathing. For you, it releases oxytocin the "love hormone." Skin-to-skin isn't just for moms. When fathers and parenting experts talk about bonding, this is usually one of the first things they recommend. It is soothing and warm and creates a bond from the first day. Try it during bath time or just before bed. Just relax, breathe, and be present. Your baby will feel safe, and you will feel more connected than ever.
Talking and Singing to Your Baby
Your voice is magic. It might sound a little silly at first, but to your baby, your voice is the most comforting sound in the world. They’ve been hearing it since their time in the womb, and it’s one of the first things they recognize after birth. That familiar sound brings them a sense of safety, warmth, and love. So, go ahead and talk about your day, describe what you're doing, or tell them how much you love them. Sing nursery rhymes or hum lullabies. This kind of communication helps with early brain development and builds trust. Plus, it's a lovely way to get involved, especially if you're exploring your own parenting style and want to create a calm, loving environment.
Getting Involved in Daily Care
Changing diapers, giving baths, dressing your baby are not just tasks. They're bonding opportunities. When fathers and parenting roles are shared early on, it creates a strong sense of teamwork and attachment.
It may be messy or awkward at first, but that's okay. Your baby doesn't care if you fumble a little. What matters is that you're there, hands-on, showing love in the most everyday ways.
Making Eye Contact and Facial Expressions
Newborns may not see far, but they can recognize faces. And the one they know best is yours. When you feed or cuddle your baby, make eye contact. Smile. Make silly faces.
This helps your baby learn emotional cues and builds trust. It's also an early lesson in communication. Every coo or grin you exchange is a step forward in your unique parenting style.
Must Read: Top Parenting Tips for New Moms and Dads
Babywearing for Hands-Free Bonding
Want to bond and still get things done? Babywearing is your best friend. Having your baby nestled close to you as you go about your day feels incredibly comforting for both of you. Using a carrier allows you to keep your baby close to your heart while walking, working, or even doing light chores.
The constant movement and your heartbeat are soothing for your baby. For fathers, babywearing is a great way to bond while still getting things done. It allows dads to stay hands-on and connected, whether it’s during a walk, while doing light chores, or just moving around the house. It’s a simple yet meaningful way to be involved and present.
Reading and Storytelling
It's never too early to read to your baby. Even if they don't understand the words, your tone, rhythm, and closeness matter. Choose board books or just tell them a story you remember from childhood.
Reading not only boosts your baby's brain development but also introduces them to your voice in a calm, comforting way. As your parenting style evolves, reading can become a favourite routine.
Playing and Gentle Touch
Newborn play doesn't need toys or gadgets. It can be as simple as tickling their toes, gently moving their arms and legs, or making funny sounds.
Your touch tells them they are safe and loved. Playfulness creates joy, and joy builds connection. This is how parenting grow stronger every day—with laughs, giggles, and cuddles.
Helping with Sleep Time
Rocking, patting, or singing your baby to sleep is deeply bonding. Even night feeds or calming them when they cry can become meaningful moments. In the quiet stillness, when it’s just you and your baby, trust and love grow stronger. Yes, it's tiring. But it's also where trust is built.
Your presence shows your baby that you’re there for them, whether it’s during the day or in the middle of the night. And that lesson stays with them forever.
Being Present and Emotionally Available
Bonding isn't just about doing. It's about being. Being calm. Being open. Being there when your baby needs comfort. You don't need to be perfect. Just present. Whether you're following a gentle or more structured parenting style, showing up emotionally teaches your child what love and safety feel like. Your baby senses when you're tuned in, even if they can't say a word.
Being emotionally present also means being supportive of your baby’s mother. Helping her rest, recover, or even just feel appreciated creates a more peaceful home environment. When your partner feels supported, she becomes more relaxed. That sense of calm also helps your baby feel safe and secure. It’s a ripple effect of love, and you're a vital part of it.
How Bonding Helps with Baby's Emotional and Cognitive Growth
Bonding isn't just sweet but it's also essential. Studies show that strong father-child bonds help babies feel secure, which boosts emotional regulation, brain development, and future learning.
Babies with present, caring dads often have better language skills, higher confidence, and deeper empathy as they grow. When we talk about fathers and parenting, we're also talking about shaping a healthier, happier next generation.
The Impact of Bonding on Long-Term Relationships
The connection you build now doesn’t just help your baby today. It creates a strong foundation for the bond you’ll share for life. Early bonding forms the emotional blueprint your child will carry forward into childhood, adolescence, and even adulthood. Trust, security, and open communication often stem from those first tender months. Your involvement today is the start of a deeply rooted, unbreakable bond tomorrow.
Conclusion
Bonding with your newborn as a dad doesn't need to be complicated. It is built through the little things like cuddles, late night songs, diaper changes, and smiles. Your love, your presence, your voice all matters more than you know.
Whether you're still figuring out your parenting style or just going with the flow, remember you are enough. Your baby already sees you as their superhero. Just keep showing up, loving deeply, and being you. That's the kind of parenting bond that lasts a lifetime.

First-Time Mom? Know All About Becoming a Mom
For many women, the experience of becoming a first-time mom is like entering an entirely different dimension. It's exciting, overwhelming, gorgeous, and sometimes a little messy...all at once. You may have read books, attended classes, and hear an endless amount of advice from friends and family about parenting, but nothing can truly prepare you for your experience as a mother. It's important to know that, as a mom, you will have many unexpected moments; some heartwarming, some tiring, and some downright confusing, and it is OK!
No mom is immune, and even if they don't talk about it all the time, they are going through it too. So, if you have been asking yourself, why you feel emotional all the time, when you will understand your baby's sleep schedule, or why do you feel like you want your old self back? You are not alone!
The purpose of this guide is to help navigate everything that no one really tells you about motherhood. And just to reassure you, you've got this, mama!
The Emotional Rollercoaster: It's Normal to Feel Overwhelmed
It feels like a rush of emotions, including love, pleasure, terror, and a little anxiety, when you hold your kid for the first time. You may be crying with joy one moment, and then you may feel totally overwhelmed the next. And what do you know? That is quite typical.
In actuality, there are many highs and lows associated with parenthood. On certain days, you may feel as though you have everything under control, while on other days, you may question whether you are doing anything correctly. Every mother experiences these emotions, so it's acceptable to grieve, miss your former life, or feel uncertain.
Just keep in mind that becoming a mother is a learning experience. You don't have to know everything at once, and there is no right or wrong method to go about it. Be gentle to yourself, take things one day at a time, and don't be afraid to ask for assistance when you need it.
Mom Guilt is Real – And How to Overcome It
No one really warns you about the guilt that comes with motherhood, right? You'll find yourself wondering, “Am I doing enough?” Should I have cuddled my baby more instead of cleaning? Did I feed them the right way? It's called mom guilt, and guess what? Almost every mom feels it.
However, the reality is that there is no such thing as being a perfect mother. Your baby only needs you; they don't require perfection. Nothing is more important than your presence, love, and caring. Therefore, give yourself a break. It's acceptable to have a messy laundry pile or a simple dinner. The happiness and health of you and your child are the most important things.
Therefore, keep in mind that you are doing your best, and that is more than enough, the next time guilt starts to creep in. Being a mother is about being there, not about being flawless.
Breastfeeding Isn't Always Easy (And That's Okay!)
You probably pictured breastfeeding as this beautiful bonding moment, and sometimes it is. But the truth is, motherhood doesn't always make it that easy. Many moms face challenges like painful latching, low milk supply, or just feeling completely overwhelmed. And guess what? That's perfectly okay.
If breastfeeding is effective for you, that's fantastic! If it doesn't, that's also acceptable. The most important thing is that your kid is fed, loved, and cared for, regardless of whether you formula-feed, breastfeed, or pump. Motherhood is defined by the love you give your child every day, not by how you feed them.
Therefore, try not to be too hard on yourself. There is no "right" way to feed a baby; every mother's experience is unique. Trust yourself, do what's best for you and your child, and never forget that what counts most is a happy, healthy mother and a happy, fed baby.
Must Read: All You Need To Know About Breastfeeding
You'll Be More Tired Than You Ever Imagined
Forget about the idea of getting a good night's sleep for a bit. Newborn babies have small stomach and will need to eat every few hours, so you'll probably be getting very little sleep. It will probably be truly exhausting and not something anyone can really prepare for.
The best thing to do is sleep when your baby sleeps, accept help from friends and family, and don't feel like you have to do it all yourself. The newborn phase can be rough, but it will only last for a while. You will eventually get more sleep and figure out a new rhythm.
Also Read: Experiencing Motherhood for the First Time
Your Relationship with Your Partner Will Change
Having a baby in your home means that your relationship with a partner may transform as well. Your attention will inevitably begin to shift to the baby, and your relationship with your partner may feel neglected. This is normal and does not mean your relationship is going downhill.
Make time for each other in your new baby dynamic even for just ten minutes of complete uninterrupted conversation. Keep in mind you are a team, and motherhood is easier when there is teamwork and support.
Your Body Will Take Time to Heal – Be Kind to Yourself
One of the most surprising parts of motherhood is realizing how long it takes for your body to heal after childbirth. Whether you had a natural birth or a C-section, recovery takes time. Your body has done something extraordinary so give it grace.
Don't rush to lose the baby weight or feel pressured to look a certain way. Focus on nourishing yourself, resting, and slowly easing into light movement when you're ready. Your body will heal in its own time.
You'll Get Tons of Advice – Learn to Filter It Out
The moment you become a mom, everyone around you suddenly becomes an expert. You'll get advice on feeding, sleeping, bathing, and even parenting styles. While some advice will be helpful, not all of it will apply to you.
Trust your instincts and do what feels right for you and your baby. Motherhood looks different for everyone, and what works for one mom might not work for you. It's okay to politely ignore unsolicited advice.
It's Okay to Ask for Help (And You Should!)
One of the biggest mistakes new moms make is trying to do it all alone. Whether it's cooking, cleaning, or caring for the baby, don't hesitate to ask for help. Motherhood is not meant to be a solo journey.
Reach out to your partner, family, or friends when you need a break. Even a 20-minute nap or a quick shower can do wonders for your mental health. Remember, taking care of yourself is just as important as taking care of your baby.
You'll Find a New Version of Yourself in Motherhood
Before becoming a mom, you had your own identity. You may think that version of yourself is lost after birth. It's simple to lose sight of your former self as you get preoccupied with feeding schedules, diaper changes and restless nights.
The lovely thing is that becoming a mother broadens your identity rather than diminishes it. You will discover patience you never thought imaginable, love you never thought conceivable, and strength you never knew you have. Give yourself permission to grow into this new you.
Conclusion
The path of becoming a mother is exciting, wonderful, and transformative. It's quite normal to feel like you've got everything under control on some days and to wonder if you're doing anything correctly on others. In actuality, there is no ideal way to be a mother. It all comes down to self-compassion, tolerance, and love.
Motherhood isn't about getting everything right; it's about showing up every day with love.
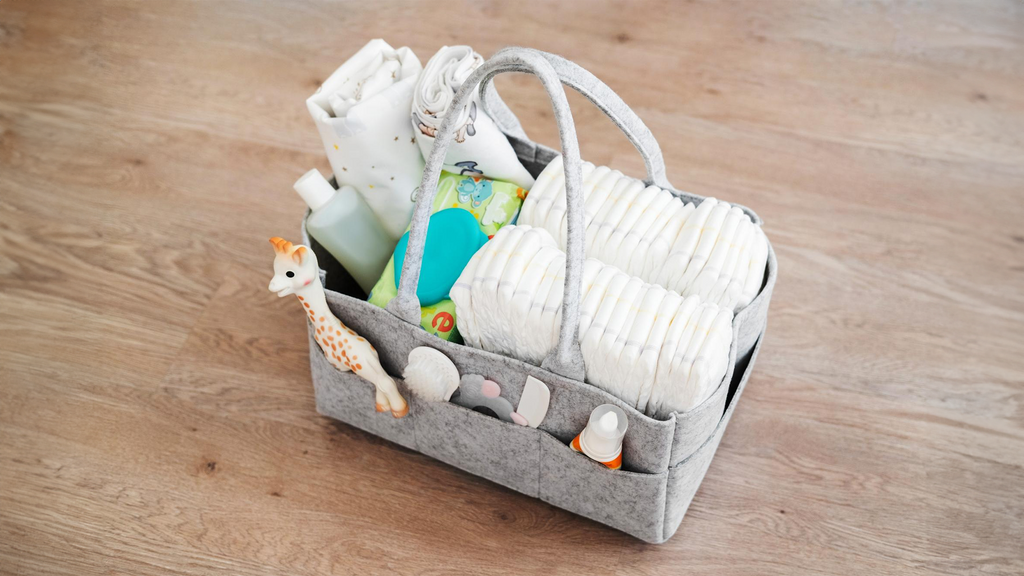
Diapering Essentials Checklist: Must-Have Items for Newborns
Bringing your newborn home is a very special time. As you settle into your new routine and get to know your baby, you'll quickly realize that some tasks become a big part of your day. One of the most frequent (and important!) ones? Diapering. It might just feel like a full-time job! It's so easy to forget how to change a diaper, or if you are a parent for the first time, you may want a diapering refresher! If you have good-quality diapering items and helpful diapering essential goods, it will make taking care of your little one a whole lot easier.
From keeping your baby comfy to avoiding messy surprises, let's go over everything you need to make diapering simple and stress-free!
Choosing the Right Diapers: Cloth vs. Disposable

One of the first decisions you'll face is choosing between cloth and disposable diapers.
-
Cloth Diapers:
Cloth diapers are environmentally friendly, reusable, and usually gentle on your baby's skin. You can find cloth diapers in a variety of different styles, from prefolds to all-in-ones. Thankfully, cloth diapers are more convenient than ever. -
Disposable Diapers:
Disposable diapers are super absorbent, useful, and an good fit for parents who prefer convenience. Just check for ones that are free from harsh chemicals, to avoid irritating your baby's sensitive skin.
There's no right or wrong choice pick what works best for you!
Baby Wipes: How to Pick the Best One for Your Baby's Skin
You'll go through a lot of baby wipes, so choosing the right kind is important.
- Opt for fragrance-free, hypoallergenic wipes to avoid skin irritation.
- Organic or water-based wipes are a great option for sensitive skin.
- Consider biodegradable wipes if you're looking for an eco-friendly choice.
Pro tip: Always do a patch test before using a new brand on your baby's skin.
Diaper Rash Cream: Preventing & Treating Irritation
Diaper rashes happen to almost every baby, but don't worry—they're totally manageable! The trick is to be prepared. A good diaper rash cream acts like a shield, keeping moisture away and calming irritated skin.
Look for creams with natural ingredients like zinc oxide, aloe vera, or coconut oil—they're gentle and super effective. And here's a pro tip: applying a thin layer at every diaper change can help prevent rashes before they even start. A happy bum means a happy baby (and a less stressed you)!
Changing Pad & Covers: Keeping Diaper Changes Clean & Comfortable
A portable changing pad is a lifesaver, whether you're at home or out and about.
- Choose a waterproof pad for easy cleaning.
- Keep extra covers on hand to swap out after messy diaper changes.
- Consider a travel-friendly changing pad for on-the-go convenience.
Having a dedicated changing area can make diapering smoother and more organized.
Diaper Bag Essentials for On-the-Go Parents
Your diaper bag will become your best friend when you're out with your baby. Here's what you should always pack:
- Diapers (at least 4-6 per outing)>
- Baby wipes
- Diaper rash cream
- Changing Sheet
- Extra baby clothes
- Burp cloths
- Hand sanitizer
- Small plastic bags for soiled diapers
A well-stocked diaper bag ensures you're always ready for any surprise messes!
Diaper Pail & Liners: Managing Odours & Hygiene
Diapering means dealing with waste, and a good diaper pail helps keep odors under control. Choose one with:
- A tight-sealing lid to trap smells
- Biodegradable liners for an eco-friendly option
- A hands-free design for easy disposal
If you're using cloth diapers, a wet bag or pail with a washable liner is a must-have.
Extra Clothing & Burp Cloths: Handling Unexpected Messes
Babies are unpredictable, and diaper leaks happen. Always keep extra clothing and burp cloths nearby to handle accidents. Soft, breathable cotton outfits are the best choice, and burp cloths can double as quick clean-up rags.
Nighttime Diapering: What You Need for Longer Sleep
A good nighttime diapering setup can help your baby sleep longer without discomfort.
- Use highly absorbent diapers to minimize overnight leaks.
- Apply a thick layer of diaper rash cream before bed.
- Keep diaper changes quick and quiet with a soft night light and pre-prepared supplies.
The goal is to keep your baby dry and comfortable so they can sleep soundly.
Conclusion
Diapering might seem like a big task at first, but with the right diapering essentials, it's a breeze! From picking the perfect diapers to keeping a well-stocked diaper bag, having the right gear makes all the difference. A little preparation goes a long way before you know it, you'll be handling diaper changes like a pro, so no stress is needed!

The Best Books to Read During Each Trimester of Pregnancy
Pregnancy is a journey filled with excitement, questions, and a rollercoaster of emotions. From the first flutter to the late-night cravings, every moment feels both magical and overwhelming. As an expectant parent, you want to prepare for every step of this incredible experience. One of the best ways to do that is through reading. Books to read during pregnancy can be your best friend, guiding you with information, tips, and reassurance as you prepare to welcome your little one into the world. If you’re wondering about the books to read during pregnancy, we’ve got you covered. Here’s a trimester-by-trimester guide to help you find the right reads.
First Trimester: Laying the Foundation
The first trimester is all about adjusting to that life-changing news. It’s a time of learning, preparing, and navigating those early pregnancy symptoms. Here are some books to read during pregnancy that can guide you through these first weeks:
“What to Expect When You’re Expecting” by Heidi Murkoff
This classic is a must-have for any expecting parent. It’s packed with information about the changes happening in your body, what your baby is going through, and how to handle those common concerns. The conversational tone makes it feel like a friend is walking you through every step of the journey. It’s definitely one of the most reliable books for first-time moms to read during pregnancy.
“I’m Pregnant, Not Terminally Ill, You Idiot!” by Lalita Iyer
Pregnancy isn’t just about medical advice—it’s about real-life experiences, too. This hilarious yet heartfelt book offers a refreshing perspective, with relatable anecdotes and witty observations that will make you laugh and feel totally understood. It’s a great reminder that you’re not alone on this journey.
“The Mama Natural Week-by-Week Guide to Pregnancy and Childbirth” by Genevieve Howland
If you’re leaning toward a natural approach, this guide is a treasure chest of holistic advice. It covers everything from nutrition to birth plans, giving you a sense of control and confidence during these early weeks. Plus, it’s beautifully illustrated and easy to follow, making it one of the most helpful books to read during pregnancy.
Second Trimester: Gearing Up
The second trimester is often called the “honeymoon phase” of pregnancy. You’re likely feeling more energetic, excited, and ready to dive deeper into the journey. It’s a great time to focus on topics like childbirth preparation and making informed decisions. Here are some books to read during pregnancy that can guide you through this phase:
“Passport to a Healthy Pregnancy” by Dr. Gita Arjun
Written by a leading obstetrician, this book is specifically tailored to Indian moms. It offers practical advice on diet, exercise, and prenatal care, making it one of the most culturally relevant books to read during pregnancy if you’re in India or want a global perspective.
“Ina May’s Guide to Childbirth” by Ina May Gaskin
If you’re considering a natural birth, this empowering book is must-read. Ina May Gaskin shares real-life stories and tips that’ll help you trust your body’s ability to give birth. It’s inspiring and deeply reassuring, making it a perfect choice for those looking to explore the power of natural childbirth.
“Expecting Better” by Emily Oster
For those who love data and research, this book is a game-changer. Emily Oster, an economist, dives into the research behind common pregnancy rules and helps you make informed decisions about what’s best for you. It’s an eye-opener that will change the way you approach pregnancy.
Third Trimester: Preparing for the Big Day
As your due date approaches, it’s time to start focusing on labour, delivery, and caring for your newborn. These books to read during pregnancy will help you get ready for the big day:
“The Birth Partner” by Penny Simkin
This book isn’t just for your birth partner—it’s for you too! It offers detailed guidance on what to expect during labour, how to manage pain, and ways to support the birthing process. It’s super practical and incredibly empowering, helping both you and your partner feel more prepared.
“Happiest Baby on the Block” by Harvey Karp
Though it’s technically about newborn care, this one’s a great read before your baby arrives. Dr. Karp shares techniques to soothe a crying baby and help them (and you) sleep better. It’s a total lifesaver for new parents, giving you the tools to feel more confident once your little one arrives.
Related article:
The Home Stretch: Journaling the Third Trimester of Pregnancy
Do’s & Don'ts in the Third Trimester of your pregnancy journey
Bonus Recommendations for All Trimesters
Some books to read during pregnancy are super helpful throughout the entire journey. Here are a couple of extras you might want to consider:
For Emotional and Mental Well-Being: “The Pregnancy Handbook for Indian Moms” by Vinita Salvi
This book takes a holistic approach to pregnancy, covering everything from the physical changes to your emotional well-being. It’s a great read if you’re looking for a balanced, thoughtful guide to help you navigate all the ups and downs of pregnancy.
For Fathers: “Pregnancy Handbook for Dads-To-Be” by Steven Bell
This one’s for the dads! It helps them understand what to expect during pregnancy and how to support their partner best. It’s one of the best books to read during pregnancy for fathers who want to feel prepared and involved.
Related articles:
Pregnancy Mood Swings! Things You Should Know
When Can You Feel Your Baby Kick? What to Expect During Pregnancy
Unlocking the Wonders of Garbh Sanskar: Shaping the Unborn Child with Traditional Wisdom
How to Pick the Pregnancy Book That Truly Fits You
Almost all the pregnancy books promise to “guide you,” but the truth is, not every book will fit right for your journey. Some moms want straight facts, some want emotional comfort, and some just want someone who sounds like they get it. If you’re wondering how to choose the right one, here’s a way to figure it out:
- Listen to what you need right now: In the early weeks, you might crave reassurance and simple explanations. Later, you might want practical tips for childbirth or newborn care. Let your current worries and curiosity guide what you pick to read.
- Check how the book makes you feel: Flip through a few pages. Does the tone comfort you? Does it stress you out? If the answers to these questions suit you, then go for this book.
- Go for the latest editions: Pregnancy advice changes quickly. A newer edition usually means updated medical information, easier tips, and fewer old-school rules.
- Pick something that matches your vibe: Prefer natural birth? Look for books that support that mindset. Want everything explained scientifically? Choose evidence-based guides. Need a little humour because the hormones are winning today? There are books for that too.
- Look for voices that understand your world: Sometimes, you just want a book that understands your food cravings, family dynamics, and healthcare system. A culturally familiar voice makes a big difference in how relatable a book feels.
- Read what other moms recommend: Moms are honest - brutally honest. Their reviews often reveal whether a book is genuinely helpful or just; pretty on a shelf.
Choosing a pregnancy book isn’t about picking the “best” one in the world. It’s about choosing the one that makes you feel calm, informed, and supported, the one that feels like someone holding your hand a little tighter on the days you need it most.
Tips for Making the Most of Your Pregnancy Reading Journey
Here are some tips to get the most out of your reading during pregnancy:
-
Start Early:
Don’t wait until the last trimester to read the books. The sooner you start, the more confident you’ll feel as your pregnancy progresses.
-
Take Notes:
Highlight key sections or jot down any questions you want to ask your doctor. It’ll help you stay on top of everything.
-
Read Together:
Share your reading with your partner, so you’re both on the same page—literally! It’s a great way to bond and stay informed together.
-
Mix It Up:
Balance out the more serious, informative books with some lighter, fun reads. It’ll keep things enjoyable and give you a nice break from the heavy stuff.
Conclusion
Pregnancy is a journey like no other, and the right books can make all the difference. Whether you’re dealing with morning sickness in the first trimester or getting ready for labour in the third, there’s so much knowledge out there to help you along the way.

How to Manage Screen Time for Kids in a Digital Age
Screens are everywhere these days—TVs, tablets, phones, and even schoolwork happens online. While tech can be super helpful, many parents wonder, Is my child getting too much screen time? The truth is, it's all about balance. You don't have to ban screens completely—just set healthy limits so kids can enjoy them without missing out on other important stuff like play, family time, and sleep.
Understanding the Impact of Screen Time on Kids
Too much screen time can mess with your child’s sleep, make them less active, and even affect their focus. Little kids especially need real-world play to learn and grow. Ever noticed a meltdown when you take away a tablet? Yep, that's a sign of too much screen attachment! But screens aren't all bad—educational shows and interactive apps can help if used the right way. The trick? Use screens wisely and in moderation!
Recommended Screen Time Guidelines by Age
Experts, including the American Academy of Paediatrics, suggest the following screen time limits:

-
0-18 months:
Avoid screen time except for video calls. -
18-24 months:
Introduce high-quality content with a caregiver watching and engaging with the child. -
2-5 years:
No more than one hour per day of educational programming, co-viewed with an adult. -
6+ years:
Consistent limits, ensuring screen time doesn't interfere with sleep, physical activity, or social interaction.
These are just guidelines. Every child is different, and it's essential to find what works best for your family's parenting approach.
Setting Healthy Screen Time Limits
Rules and structure help kids understand expectations. Try these tips:
-
Set clear limits:
Have a daily or weekly screen time allowance. -
Create screen-free zones:
Keep bedrooms, mealtimes, and family gatherings screen-free. -
Use timers:
Visual or audible timers help kids transition from screen time to other activities. -
Lead by example:
If kids see parents glued to screens, they will follow suit.
Encouraging Alternative Activities
One of the best ways to reduce screen dependence is to provide engaging alternatives.
-
Outdoor play:
Running, jumping, and playing outside helps with physical and mental well-being. -
Creative activities:
Painting, building, and crafting keep little hands busy. -
Reading together:
A book before bed is a great way to wind down without screens. -
Family bonding time:
Board games, puzzles, and storytelling can be fun, screen-free activities.
Making Screen Time Meaningful
Not all screen time is equal. Educational apps, interactive videos, and creative tools can offer real value.
-
Choose high-quality content:
Opt for shows and apps that encourage learning and creativity. -
Co-watch and discuss:
Watch with your child and talk about what they're seeing. -
Encourage active screen time:
Games or shows that require movement or problem-solving are better than passive viewing.
Teaching Healthy Digital Habits
Teaching kids how to use screens responsibly is a vital part of parenting in the digital age. Help them understand the importance of:
-
Taking breaks:
Encourage the 20-20-20 rule—every 20 minutes, look 20 feet away for 20 seconds. -
Being mindful of content:
Explain why some content is better than others. -
Understanding online safety:
Teach them about privacy, cyberbullying, and appropriate behaviour online.
Handling Resistance & Screen Time Tantrums
Cutting back on screen time isn't always easy. Kids may resist but staying firm and consistent is key.
-
Give warnings:
A five-minute heads-up can help ease transitions. -
Offer choices:
Instead of "No more screens," say, "Would you like to read or play outside?" -
Stay calm:
Reacting with frustration can escalate the situation. Instead, acknowledge their feelings and redirect them.
Finding a Balance: It's About Moderation, Not Elimination
Screens aren't the bad guys and banning them completely isn't the solution. It's all about balance! Some days, kids might spend more time on screens, and that's totally fine. What really matters is having a routine that mixes screen time with play, learning, and family moments. When used the right way, screens can be a helpful tool—not a problem!
Conclusion
Managing screen time can feel like a daily battle, but with the right approach, it gets easier! Set limits, offer fun, screen-free activities, and make sure screen time is actually helpful—not just mindless scrolling. With a little patience and consistency, you can teach your child to use technology in a way that helps them learn, grow, and stay healthy. Balance is the key!
Related Read: Top 10 Parenting Tips for New Moms and Dads

Secrets of Licorice: Ancient Remedy or Modern Superfood?
Parenting is a journey of continuous learning, blending tradition with modern care. Licorice, known as mulethi in India, is a natural herb valued for its soothing, antimicrobial, and anti-inflammatory properties. Exploring the Secrets of Licorice reveals how it can enhance your baby’s daily care with gentle, natural benefits—like using Organic Licorice for purity or Licorice Root Sticks for traditional wellness.
What is Licorice?
Licorice is a beloved herb, prized for its naturally sweet taste, soothing qualities, and healing potential. The Secrets of Licorice reveal themselves in its long-standing use in herbal remedies, where its anti-inflammatory and antimicrobial properties shine, supporting wellness in gentle, effective ways. Whether it’s Real Black Licorice, offering an authentic, robust essence, or Organic Licorice, delivering a pure and clean touch, this herb adapts to countless needs. Beyond its role in baby care—like calming irritated skin or easing mild congestion—it extends into broader traditions, bridging ancient wisdom with modern parenting. From vapor rubs to teething aids, licorice proves its versatility, providing a natural boost to daily routines. Its sweet charm and protective benefits make it a standout choice for nurturing little ones, ensuring comfort without harsh chemicals—a perfect blend of nature’s best for today’s caregivers seeking reliable, time-tested solutions.

Benefits of Licorice in Baby Care Products
Licorice has become a cornerstone in baby care, delivering gentle nourishment and protection that parents can trust—picture it as the Best Licorice for your tiny tot. Unlocking the Secrets of Licorice unveils its remarkable benefits, making it a standout ingredient in products designed for little ones. This herb’s natural properties soothe and shield, offering a safe, effective way to care for delicate skin and beyond. From calming irritations to providing a protective barrier, licorice proves its worth in everyday routines. Its gentle touch ensures babies stay comfortable without harsh chemicals, blending tradition with modern care seamlessly. Whether in creams, rubs, or cleansers, licorice enhances the nurturing experience, showing why it’s a go-to choice for thoughtful parenting today.
-
Gentle on Delicate Skin
Licorice brings its anti-inflammatory magic to baby care, easing redness and irritation with a soft, calming effect—perfect for diaper rash creams and soothing treatments. The Secrets of Licorice spotlight how it comforts sensitive skin, offering a gentler approach than something like Cinnamon Licorice might imply with its bolder profile. This herb works wonders on tender areas, reducing discomfort without overwhelming delicate systems. Parents can rely on its natural properties to keep their baby’s skin smooth and irritation-free, especially during those fussy moments. Unlike harsher options, licorice provides a nurturing touch that aligns with the needs of little ones, making it a staple in gentle care routines that prioritize safety and comfort above all.
-
Protection Against Bacteria
Licorice’s antimicrobial strength steps up in baby care, guarding fragile skin against harmful bacteria with ease. It shines in vapor rubs, soothing mild colds and congestion—a subtle treasure within the Secrets of Licorice, far from the intense flavor of Chocolate Licorice, which isn’t suited for babies. This herb acts as a natural shield, keeping infections at bay while offering relief during stuffy nights. Its protective qualities extend beyond the surface, ensuring your little one stays healthy and comfortable. Safe and gentle, licorice in these products provides peace of mind for parents, blending efficacy with nature’s care. It’s a quiet hero in maintaining baby wellness without relying on synthetic additives.
-
Natural Cleanser in Baby Products
Infused in shampoos and soaps, licorice keeps baby skin soft and tackles issues like cradle cap with a tender touch. The Secrets of Licorice reveal its knack for gentle cleansing, surpassing flavored varieties like Strawberry Licorice that don’t fit baby-safe formulas. This herb cleans without stripping natural oils, leaving skin smooth and nurtured—a perfect ally for daily baths. Its soothing nature ensures even the most sensitive scalps stay calm, making it a parent’s friend in maintaining hygiene naturally. Licorice stands out for its ability to care gently, avoiding the harshness other cleansers might bring, and keeps your baby’s skin in top shape with ease. -
A Healthy Sweetener
Licorice offers a natural sweetness that safely replaces refined sugar in teething products, easing the baby’s discomfort with care. This lesser-known perk among the Secrets of Licorice makes it ideal for little ones, not like Chocolate Licorice, crafted for adult indulgence. Its mild flavor comforts without overloading tiny systems, providing a gentle alternative in soothing gels. Parents can trust this herb to deliver sweetness that’s safe and effective, steering clear of artificial additives. Licorice’s role here highlights its versatility, ensuring teething moments are less stressful and more natural, keeping your baby happy and healthy with every use. -
A Natural Mosquito Repellent
Licorice powers mosquito repellents and patches, creating a soft yet strong shield against insects for your baby. The Secrets of Licorice extend to this natural defense, with Real Black Licorice extract boosting its strength beyond flavors like Cinnamon Licorice or Strawberry Licorice. This herb keeps bites at bay without harsh chemicals, offering a gentle barrier that’s safe for delicate skin. It’s a smart, natural way to protect your little one outdoors, blending efficacy with care. Licorice proves its worth here, giving parents a worry-free option to keep their baby comfortable and bite-free every day.

How to Use Licorice Safely
Using licorice safely unlocks more of its Secrets of Licorice for your baby’s care:
- Patch Test: Always test a small amount—like a dab of Black Licorice-infused cream—on your baby’s skin to check for reactions.
- Choose Baby-Specific Products: Use products formulated for babies to ensure the right concentration, avoiding strong types like Black Licorice.
- Follow Label Instructions: Stick to the recommended usage to avoid overexposure with this Best Licorice.
- Consult Your Pediatrician: Before introducing new products, seek medical advice for your baby’s safety, especially with unique options like Licorice Root Sticks.
Conclusion
Licorice is a gentle yet effective ingredient in baby care, offering soothing and protective benefits. By understanding the Secrets of Licorice, you can opt for baby-friendly formulations and consult your doctor before introducing new products to ensure the best care for your little one.
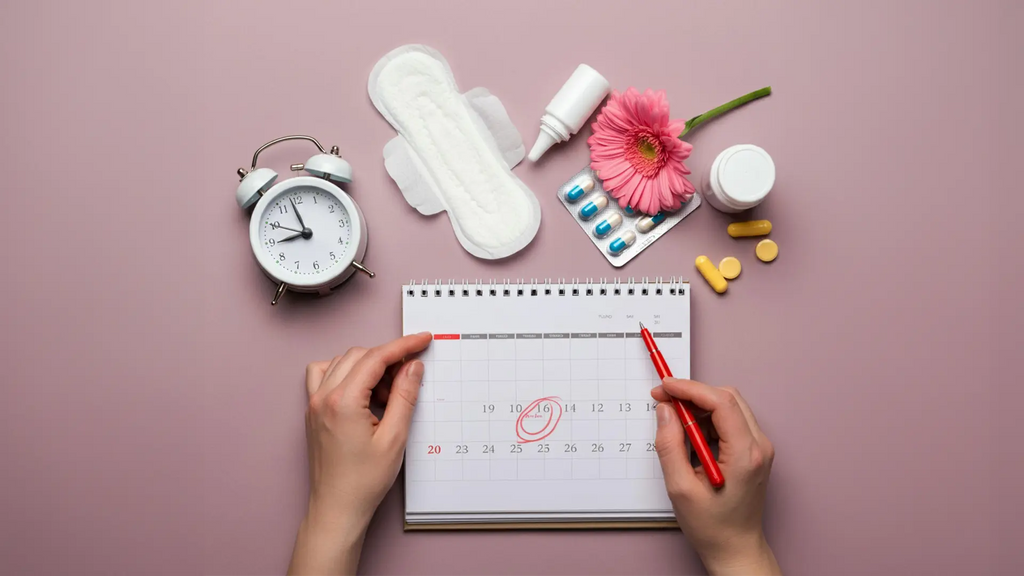
Understanding Your Menstrual Cycle and Ovulation
Understanding your menstrual cycle and ovulation is key to mastering fertility and health. Whether planning a pregnancy or monitoring your body, this guide breaks it down simply. From phases to tracking methods, we’ll help you navigate this natural rhythm with confidence and care.
What is the Menstrual Cycle?
The Menstrual Cycle and Ovulation define the time from the first day of one period to the first day of the next. A typical cycle lasts between 21-35 days, with 28 days being the average. Using a Period and Ovulation Tracker can simplify understanding these phases:
- Menstrual Phase: Shedding of the uterine lining, leading to bleeding (3-7 days).
- Follicular Phase: The body prepares for ovulation by developing follicles in the ovary.
- Ovulation Phase: A mature egg is released from the ovary, usually mid-cycle.
- Luteal Phase: The body prepares for pregnancy or starts a new cycle if fertilization doesn’t occur.

How to Track Your Cycle for Pregnancy Planning?
Accurately tracking your Menstrual Cycle and Ovulation is crucial for pregnancy planning. Begin by recording your cycle's start date, the first day of your period, with a Menstrual Cycle Calculator. Note cycle length, typically 21-35 days. Ovulation, when an egg is released, usually occurs 12-14 days before your next period. Monitor basal body temperature (BBT) for a slight rise post-ovulation. Observe cervical mucus changes; clear, stretchy mucus indicates fertility. Utilize ovulation predictor kits (OPKs) to detect luteinising hormone (LH) surge, signalling impending ovulation. Combine these with a Period Ovulation Tracker for accurate fertility window identification.
You Might Like This: Pregnancy Conception Calculator
What is Ovulation?
Ovulation occurs when a mature egg is released from the ovary, typically around the midpoint of the cycle. The egg survives for 12-24 hours, but sperm can live in the female body for up to five days. This means the days leading up to ovulation, tracked via a Fertile Days After Period Calculator, are also fertile and crucial for conception.
How to Calculate Ovulation?
Knowing your Menstrual Cycle and Ovulation helps in planning conception effectively. A Menstrual Cycle Calculator can estimate your cycle length easily:
- Track Your Cycle Length: Count the days from the first day of your period to the first day of the next period. A normal cycle is between 21-35 days.
- Determine Your Ovulation Day: Ovulation typically occurs about 14 days before your next period. For example, if your cycle is 28 days, ovulation occurs around day 14.
- Identify Your Fertile Window: The most fertile days, pinpointed by a Fertile Days After Period Calculator, are the five days leading up to ovulation and the ovulation day itself.

Signs of Menstrual Cycle and Ovulation
Recognizing ovulation signs is key to predicting your fertile window. During this time, you may notice several changes in your body. Cervical mucus typically becomes clear, stretchy, and slippery, resembling egg whites—a sign tracked by the Best Period and Ovulation Tracker. After ovulation, your basal body temperature (BBT) may show a slight rise. Ovulation test kits can also be used to detect the surge in luteinizing hormone (LH), which triggers ovulation. Some women may experience mild pelvic pain, known as Mittelschmerz, lasting a few hours to a day. Additionally, increased libido and energy levels are common indicators of ovulation.

Using an Ovulation Calculator
An ovulation calculator estimates your most fertile days based on your menstrual cycle ovulation. While it provides a general idea, combining it with physical ovulation signs and a Period Ovulation Tracker enhances accuracy. These calculators, especially an Ovulation Calculator for Irregular Periods, are useful but should be used alongside other tracking methods for the best results.

How Accurate is Ovulation Prediction?
Ovulation prediction methods vary in accuracy depending on your menstrual cycle and ovulation patterns. Here’s a breakdown with tools like the Most Accurate Period Tracker Online:
Ovulation Calculators: Provide estimates but do not guarantee exact ovulation timing,as cycle lengths can fluctuate.
Basal Body Temperature (BBT): About 75-80% accurate in confirming ovulation after it has occurred.
Cervical Mucus Observation: Can be 70-90% accurate when tracked consistently with a Period and Ovulation Tracker.
Ovulation Predictor Kits (OPKs): Detect LH surges and are about 99% accurate in predicting ovulation within 24-36 hours. Using multiple methods, including an Ovulation Calculator for Irregular Periods, increases reliability. If cycles are irregular, consulting a doctor is recommended.
The Role of Hormones in Ovulation
Hormones are vital as they regulate your menstrual cycle and ovulation seamlessly. . Follicle-stimulating hormone (FSH) initiates egg development within the ovaries. Luteinizing hormone (LH) then triggers the release of a mature egg. Estrogen levels increase before ovulation, resulting in fertile cervical mucus—insights you can gain from the Best Period and Ovulation Tracker. Post-ovulation, progesterone rises, preparing the uterus for potential pregnancy. The optimal time for conception is within the fertile window, which spans approximately six days: the five days preceding ovulation and the day of ovulation itself. Intercourse during this period significantly enhances pregnancy likelihood. Sperm can survive in the female reproductive tract for up to five days, making intercourse before ovulation advantageous.
How to Improve Ovulation Naturally?
Maintaining a healthy menstrual cycle and ovulation involves several key practices. Consume a balanced diet rich in essential vitamins and minerals, including folic acid, zinc, and iron. Effectively manage stress, as elevated stress levels can disrupt hormone balance and postpone ovulation. Maintain a healthy weight, as both underweight and overweight conditions can negatively impact ovulation—track progress with the Most Accurate Period Tracker Online. Engage in regular, moderate exercise to support hormonal equilibrium. Consult a healthcare professional if you experience irregular, excessively painful, or absent menstrual cycles for several months, as these may indicate hormonal imbalances or underlying fertility-affecting conditions. Additionally, seek medical advice if you have been attempting to conceive for over a year, or six months if you are over 35.
Conclusion
Tracking your menstrual cycle and ovulation is essential for understanding fertility. Whether If you are planning to conceive or simply monitoring your health, knowing your fertile window can be highly beneficial. Menstrual cycle calculators and tracking tools provide helpful estimates, but combining multiple methods ensures the best accuracy. If you experience irregularities or difficulty determining ovulation, seeking medical advice is recommended.
How to Choose Right Feeding Bottle: A Step-by-Step Guide
Feeding your baby is more than just providing nutrition; it's a ritual of connection, a moment of comfort and care. It's a moment when tiny hands grasp your finger, eyes lock with yours, and a deep sense of love washes over you. Elevate this precious experience with a thoughtfully designed feeding bottle that supports both your baby's needs and your parenting journey. Embrace a feeding experience that nurtures your little one's body and also the beautiful bond you share.
Feeding and Its Importance

1. Nutritional Needs for Growth and Development
- Feeding is important to ensure that babies get all the nutrients and vitamins for their growth and overall development.
- During the first six months, a baby relies entirely on milk for his nutritional needs,whether it is breastfeeding, formula feeding, or a combination of both.
- Proper feeding provides key nutrients like protein, fats, and vitamins and helps build strong immunity and brain development.
- When choosing the best baby bottles, make sure they provide comfort, safety, and the right milk flow to support these needs.
2. Bonding Between Parents and Baby
- Feeding also helps in building a bond between parents and their baby.
- Feeding helps strengthen the emotional connection between parent and child.
- The close contact during feeding helps promote a sense of security for the baby.
- Breastfeeding is beneficial for mothers as it releases oxytocin, a hormone that promotes bonding with the baby and aids in postpartum recovery.
- The best bottles for newborns often replicate this natural closeness through design that mimics breastfeeding.
3. Challenges in Feeding
Every baby and every mother is different, and their journey is unique.
- Some mothers may face challenges such as latch issues, milk supply problems, or allergies.
- In such cases, feeding bottle use becomes an alternative method to ensure that the baby receives adequate nutrition.
- The best breastfeeding bottles can help bridge the gap for mothers who need to switch between breastfeeding and bottle feeding.
How to Select the Best Feeding Bottle?

Today, when the market is flooded with numerous options. Making the right choice for your baby can be difficult. Here is a list of things you can look for while opting for a feeding bottle.
1. Material and Safety
The first thing you need to know is the material of the feeding bottle you are purchasing for your baby. There are different types of bottles available in markets, such as plastic, glass, and silicone bottles.
- Plastic bottles are cheaper in comparison to other bottles, but they can harm your child's health directly. These bottles contain toxic materials that may leach into the stored liquid and pass into the baby’s body.
- Glass bottles require good maintenance, but are very easy to clean and sterilize. The only safety concern is that they can break easily.
- Silicone bottles are best in terms of quality, and there are no safety concerns even in long-term usage.
2. Nipple Design and Flow
Another important element of a feeding bottle is the nipple since your baby will be sucking on it, therefore it has to be of the finest quality.
- Ensure it has a design that helps with regular milk according to the baby’s needs and capacity.
- A good quality silicone nipple that mimics breastfeeding is very popular these days since these are best for newborns and help them adapt to feeding with the least amount of effort.
- You can find different bottle sizes and nipple designs for your baby’s varied feeding needs at different ages, which means that as the baby grows, the milk flow will automatically increase without causing any discomfort.
- For young babies, slow-flow bottles are recommended to control the intake and reduce the risk of choking.
3. Anti-colic Features
Another common problem that parents face with bottle feeding is colic pain.
- The air that the baby swallows while feeding can cause abdominal pain.
- With modern designs, many feeding bottles are equipped with anti-colic vents.
- Anti-colic vents help reduce the intake of air during feeding.
- This feature helps prevent gas, bloating, and colic in babies.
- The best bottles for newborns often feature advanced vent systems to make feeding easier and more comfortable.
4. Ease of Cleaning
- Opt for bottles with wide necks or simple designs that are easy to clean.
- Look for bottles that are heat resistant, and can be sterilised.
- Look for bottles that are microwave-safe.
- The best breastfeeding bottles make cleaning less time-consuming with features like detachable parts and wide openings.
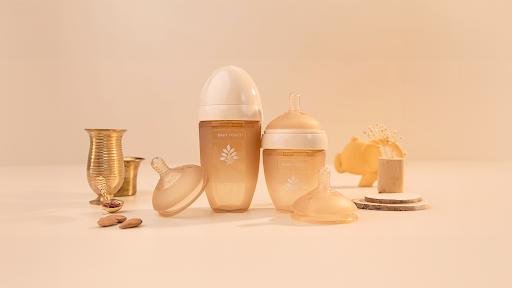
Why choose the Laad Pyaar Feeding Bottle

When it comes to nurturing your little one, every detail matters. That’s why Baby Forest brings you the Laad Pyaar baby feeding bottle, designed with the care and innovation to ensure a safe, comfortable, and natural feeding experience for your baby. This is a combination of functionality with thoughtful design. This best baby bottle offers features that set it apart in the world of baby care products.
Designed for Every Baby
The Laad Pyaar Baby feeding bottle comes in two sizes to cater to your baby’s growing needs.
- For newborns aged 0-6 months, the 150ml variant provides the perfect capacity for their small appetites.
- For babies aged 6 months and older, the 260 ml variant is ideal, offering a generous size for their increasing feeding requirements.
- With two flow options, slow for younger infants and medium for older babies, the bottle adapts seamlessly to your child’s development stage.
- Slow flow bottles are especially ideal for younger babies, helping them suckle at a natural pace without overwhelm.
A Natural Feeding Experience
- The laad pyaar baby feeding bottle mimics the natural feel and movement of breastfeeding.
- The soft, skin-like texture of the bottle and its uniquely designed nipple provide a breastfeeding-like experience, ensuring an easy transition for your baby.
- Making it an excellent choice for moms who want to combine breastfeeding with bottle feeding without causing nipple confusion.
Prevents Colic and Fuss
Colic and gas can cause discomfort for babies and sleepless nights for parents. The Laad Pyaar baby feeding bottle has
- Dual anti-colic vents, which minimize air intake during feeding, reducing the chances of gas and fussiness.
- The innovative nipple design ensures a steady flow of milk, preventing overfeeding and promoting a comfortable feeding experience for your baby.
Convenience/Cleaning

Cleaning baby bottles can be a challenging task, but the Laad Pyaar baby feeding bottles simplify the process
- It has an ultra-wide neck design. This unique feature allows an effortless cleaning by hand, ensuring hygiene without the hassle.
- This bottle is made from FDA-approved food-grade material, which is non-toxic, and durable.
- Heat-resistant up to 180 °C, making it ideal for microwaves, sterilizers, and boiling water.
Baby Feeding Chart
While bottle feeding, understanding your baby’s changing needs is important. Here’s a helpful guide based on your baby’s age.
| Age ( Months ) | Quantity ( ml Per Feeding) | Hours |
|---|---|---|
| 0 - 1 Months | Start with 30 ml Milk | Every 2-3 Hours |
| 1 - 3 Months | 90 - 120 ml Milk | Every 2-3 Hours |
| 3 - 6 Months | 120 - 150 ml Milk | Every 3-4 hours |
| 6 - 12 Months | 120 - 240 ml Milk (add 2 tablespoons of solids per meal) | Every 3-4 hours |
| 12 - 24 Months | 180 - 240 ml Milk (Supplemented with Solid) | Every 4-6 hours |
Always use baby feeding bottles according to your baby’s age and feeding stage. For newborns, using smaller bottles with slow-flow nipples works best. As your baby grows,switch to larger bottles and faster flow nipples to match their feeding pace.
Also Read: Baby Feeding Chart

Maintenance and Replacement
Proper care and timely replacement of baby feeding bottles are essential to ensure your baby’s safety and hygiene.
- Regular use and sterilization can cause wear and tear over time.
- Check the bottle, nipple, and cap regularly for cracks or any signs of damage.
When to replace the bottle and the nipple
- For the bottle nipple, you can change your bottle nipple every 3 months or sooner if you notice signs of wear and tear or a change in flow rate.
- For the bottle, you can replace the bottle every 6 months or when there are visible cracks, or an odour despite thorough cleaning.
Conclusion
Feeding is not just about nourishment; it’s about connection, security, and trust. Choosing the right feeding solution ensures that your little one gets the care they deserve, without unnecessary discomfort. A well-designed feeding bottle can make all the difference, easing transitions, preventing colic, and making feeding a joyful, stress-free experience.
That’s why thoughtful choices, like selecting a safe, high-quality, and baby-friendly bottle,matter. Products like Laad Pyaar by Baby Forest bring innovation and care together,ensuring that every feeding moment is as natural and comforting as a parent’s embrace.

Hospital Bag Checklist for Delivery 2025
Mummas are always pre-prepared for their babies, but preparing for the crucial delivery time is everyone's task in the family. The suitable time to start collecting and packing things up is three or at least two weeks before the due date of the delivery, and if you feel the signs are earlier, start packing your hospital bag for delivery bag at the moment. This blog is the right place to 'get to know maternity essentials' if you are a mother with her grand day on the way or if you are the lucky partner of the one! Following is the checklist of all-important articles for mom and baby that need to reach the hospital.

Hospital Bag Checklist For Baby

Swaddle and Soft Blankets
Family and friends are sure to shower their blessings upon hearing the good news of your newborn's arrival, often eager to visit. To ensure your little one stays cozy and warm during these joyous moments, it's a great idea to include extra-soft, warm, and lightweight baby blankets in your maternity bag.

Consider swaddles as an essential addition – these snug wraps provide a sense of security for newborns and help regulate their body temperature. Opt for breathable and gentle fabrics like high-quality, super soft bamboo muslin fabric, allowing your baby to feel comfortably cocooned while ensuring proper airflow.

Going Home Outfit
This will be the first thing that the baby will wear as an outfit. You can keep something comfortable and traditional or something memorable knitted by grandmas for your little one.
Wipes, Diapers, And Nappies
Handmade cotton nappies have been the safest and the neatest option from day one. Since we can bathe a baby after 24 hours and not daily, baby wipes are essential for cleaning. You can also use comfortable and soft diapers based on your choice.
Ritual Ingredients
Every culture performs rituals right after birth or a day after. One commonly known tradition is Jatakarma, where the father puts a tiny drop of honey onto the baby's tongue. So make a mini checklist for ingredients and pack some sweets for the guests!
Socks and Mittens
Unlike adults, it might be crucial for babies to adapt to the temperature. And if the weather is cold, socks, knitted caps, and mittens are essential to comfort newborns. Mittens will also protect the baby from hurting themselves from their sharp nails.
A Checklist for Mothers on Hospital Bag for Delivery

Your Medical Records
Remember to check out the copies of previous medical reports. It might be the case that your delivery doctor can be different from your regular doctor; hence It will save a lot of time on formalities. And if you have a birth plan, take multiple copies to provide to the medical team.
Gowns and Bathrobe
We are all familiar with the exceptional comfort of our home clothes. You might not feel warm and cozy wearing those hospital gowns. So, pack your convenience with you in your hospital bag for delivery!
Pillow
That one pillow that, if ever gets switched, you find it difficult to sleep, remember to carry that with you.
Toiletries and Towels
These are the most random but essential daily things that cause acute discomfort if they are not there. Make a carry case with extra clean towels with your hairbrush, toothpaste, shampoo, body wash, lotion, etc.
Plus Size Underwear and Pads
Postpartum absorbent underwear will be the most helpful thing you can carry for a soon-to-be mother. Secondly, say no to tampons for this time and pack yourself comfortable heavy-duty maternity pads.
Nursing and Supportive Bra
This part of life as a woman is one of the most beautiful, with a lot of pain to endure. To ease it a little bit, buy a supportive bra and a nursing one to feed your baby easily.
Related article:
Things to do a Week Before your Due date!
How to Prepare for Labor and Delivery
The Countdown Begins: Recognizing the Signs of Labor

When Will I Feel My Baby Move? Understanding Quickening i...
Pregnancy is full of magical moments, but one of the most exciting is feeling your baby move for the first time. That tiny flutter, called quickening in pregnancy, is your baby's way of letting you know they're growing and doing well.
But when will it happen? What does it feel like? And what if you haven’t felt anything yet? Let's break it down into simple terms, so you know what to expect from this special milestone.
What Is Quickening?
Quickening in pregnancy is when you first feel your baby move inside the womb. It's a special moment that makes everything feel real! At first, these movements may feel like soft flutters, tiny bubbles, or gentle taps. As your baby grows bigger and stronger, those little sensations will turn into kicks, stretches, and rolls that you can feel more clearly.
When Does Quickening Start?
Most moms-to-be feel quickening in pregnancy sometime between 16 to 22 weeks, but every pregnancy is different. If it's your first baby, you might not notice those tiny movements until around 20 weeks. If you've been pregnant before, you might recognize them as early as 16 weeks. Things like your baby's position, where your placenta is, and even your body type can affect when you feel those first little flutters.
What Do Baby Movements Feel Like?
At first, your baby's quickening movements are very gentle. Many moms say they feel like:

- Butterfly wings fluttering inside.
- Tiny bubbles popping in your belly.
- A soft tapping sensation.
- Light muscle twitches, almost like a little flick.
As your baby gets bigger and stronger, those delicate flutters turn into kicks, jabs, and rolls. By the third trimester, you might even see your belly move as your little one stretches and wiggles around in their cosy home!
Where Will I Feel My Baby's First Movements?
In the beginning, you'll probably feel quickening in pregnancy in the lower part of your belly, below your belly button. It's easiest to notice when you're sitting still or lying down since there are fewer distractions. As your baby grows and your uterus expands, those movements will shift higher up and become stronger, making them even more exciting to feel!
Related Read - When Can You Feel Your Baby Kick?
How to Encourage Baby Movements
If you're eager to feel your baby move or want to bond with them, here are some gentle ways to encourage movement:
- Eat or drink something sweet – A small glass of juice or a snack can give your baby a little energy boost.
- Lie down and relax – Babies are often more active when you're still, so try lying on your side and paying close attention.
- Gently prod your belly – Sometimes, a little nudge can get your baby to respond with a kick or roll.
- Talk or play music – Babies can hear sounds from the womb, and some may react to familiar voices or soothing melodies.
What If I Don't Feel Quickening Yet?
If you haven't felt any movements by 22 weeks, don't panic! Every pregnancy is different. Some reasons for a delayed quickening in pregnancy include:
- Placenta positioning – If you have an anterior placenta (where the placenta is in front of the baby), it can cushion movements, making them harder to feel early on.
- Your body type – If you carry extra weight around your belly, movements might not be as obvious at first.
- First-time pregnancy – If this is your first pregnancy, it might take longer to recognize the feeling.
Always check with your doctor if you're concerned. They can use an ultrasound or a Doppler to reassure you that your baby is doing well.
How Baby Movements Change Throughout Pregnancy
Your baby's movements will evolve as they grow. Here's what to expect:

By the third trimester, doctors recommend tracking your baby’s movements. A common guideline is to feel at least 10 movements in two hours. If you notice a decrease in activity, contact your doctor.
Conclusion
Feeling your baby move for the first time is a truly special moment, a little reminder that your baby is growing and thriving inside you. Quickening in pregnancy is different for every mom—some feel it early, while others may have to wait a bit longer. If you haven’t felt those first tiny flutters yet, don’t worry—it will happen soon! And when it does, enjoy every little kick, wiggle, and roll. Your baby is already connecting with you in the most beautiful way!

Top 10 Fun and Easy Baby Shower Games for an Unforgettabl...
Planning a baby shower is always so exciting, isn't it? But you know what makes the celebration unforgettable? The baby shower games! These games are the perfect way to break the ice, get everyone laughing, and create beautiful memories for the parents-to-be and their guests. Whether throwing a cosy get-together with close friends or hosting a big, fun-filled party, adding a few baby shower games will keep the energy high and the smiles even bigger.
The best part? Baby shower games don't have to be complicated or over-the-top. Simple, fun, and easy-to-plan games are often the ones that bring the most joy. From guessing baby food flavours to testing everyone's knowledge about the mom-to-be, there are so many creative ways to keep your guests entertained.
In this article, we've rounded up 10 fun and easy baby shower games that will make your celebration a hit. So, get ready to create some heartwarming moments and loads of laughter!
Why Baby Shower Games Matter
You might be wondering — why play baby shower games in the first place? Well, think about it — a baby shower usually brings together friends, family, and sometimes even distant relatives who may not know each other very well. Baby shower games are the perfect icebreaker to get everyone chatting, laughing, and bonding, making the whole event feel warm and welcoming.
Plus, let's be honest — what's a celebration without a little fun? Playing baby shower games keeps the energy up, adds a burst of excitement, and creates unforgettable moments for everyone, especially the parents-to-be. Every laugh, every funny answer, and every creative game will turn into a cherished memory that they'll look back on fondly.
So, whether you're planning a small, cosy gathering or a big bash, including a few baby shower games is a sure-shot way to make the day extra special for everyone involved. After all, isn't that what celebrations are all about?
Top 10 Fun and Easy Baby Shower Games
Here are ten fantastic baby shower games that are easy to set up and guaranteed to make your event a hit.
1. Guess the Baby Food

- What you need: Several jars of baby food (different flavours), spoons, and blindfolds.
- How to play: Remove the labels from the baby food jars. Blindfold each participant, give them a spoonful of baby food, and have them guess the flavour. The person with the most correct guesses wins!
- Why it's fun: This game is hilarious because the flavours can surprise the players, leading to some priceless reactions.
2. Baby Bingo
- What you need: Printable baby bingo card pens.
- How to play: Create bingo cards with common baby shower gifts (like diapers, bibs, onesies, etc.). As the mom-to-be opens her gifts, guests mark off the items on their cards. The first person to get five in a row wins.
- Why it's fun: It keeps everyone engaged during the gift-opening time.

3. Don't Say Baby
- What you need: Clothespins or safety pins for each guest.
- How to play: As guests arrive, give them a pin and instruct them not to say the word "baby." If someone hears another guest say "baby," they can take their pin. The person with the most pins at the end wins.
- Why it's fun: It's hilarious to see how hard people try to avoid saying "baby” during a baby shower!
4. Who Knows Mommy Best?
- What you need: Printed question sheets about the mom-to-be (favourite food, craving, nursery theme, etc.)
- How to play: Guests answer questions about the mom-to-be. The one with the most correct answers wins.
- Why it's fun: This game is perfect for celebrating the mom-to-be while letting guests show off how well they know her.
5. Dirty Diaper Game
- What you need: Different chocolate bars, diapers, microwave.
- How to play: Melt different types of chocolate bars in diapers to resemble baby poop. Guests have to guess the type of chocolate by smelling or tasting it. The person with the most correct answers wins.
- Why it's fun: This game is grossly hilarious and gets everyone laughing.
6. Baby Name Race
- What you need: Paper, pens, and a timer.
- How to play: Set a timer for 2 minutes. Ask guests to write down as many baby names (starting with a specific letter) as possible within the time limit. The guest with the most names wins.
- Why it's fun: It’s fast-paced, competitive, and a great icebreaker.
7. Advice for Parents-to-Be
- What you need: Notecards and pens.
- How to play: Have guests write down their best parenting advice or funny parenting tips. Collect the cards and present them to the parents-to-be as a keepsake.
- Why it's fun: It’s heartfelt and meaningful, leaving the new parents with valuable advice and smiles.

8. Guess the Baby Bump Size
- What you need: String, scissors, and a marker.
- How to play: Ask each guest to cut a piece of string that they think will fit perfectly around the mum-to-be’s belly. Measure the belly, and the closest guess wins.
- Why it's fun: It’s light-hearted and creates some good laughs.
9. The Price is Right: Baby Edition
- What you need: Baby items (diapers, pacifiers, formula, etc.), paper, and pens.
- How to play: Display various baby items and have guests guess the price of each item. The person with the most accurate guesses wins.
- Why it's fun: This game is practical and entertaining!
10. Diaper Raffle
- What you need: Raffle tickets and diapers.
- How to play: Ask guests to bring a pack of diapers in exchange for a raffle ticket. Draw a winner during the shower.
- Why it's fun: It’s a clever way to help the parents-to-be stock up on diapers while making the event exciting.
Related Article: How to Plan the Perfect Baby Shower
Tips for Hosting a Fun Baby Shower Game Session
To make sure your baby shower games run smoothly, keep these tips in mind:
- Keep it short and sweet: Don't overwhelm guests with too many games. Aim for 3-5 fun games.
- Offer fun prizes: Small prizes like gift cards, candles, or cute home decor items make winning even more exciting.
- Mix it up:Plan a mix of high-energy and low-energy games to keep the mood balanced.
- Involve the mom-to-be: Make sure she is comfortable and engaged in the games.
- Have a game host: Designate someone to explain and facilitate the games.
Prizes and Party Favors for Game Winners
Everyone loves a good prize! Consider these simple and cute prize ideas for your baby shower games:
- Scented candles
- Mini photo frames
- Gift cards
- Personalized mugs
- Handmade soaps
For party favours, you could offer small keepsakes like:
- Mini succulent plants
- Customized cookies
- Scented sachets
- Thank you cards
Conclusion
Baby shower games are truly the heart of any fun and unforgettable celebration. They do more than just pass the time — they bring people together, spark laughter, and create beautiful memories for the mom-to-be. After all, what's better than sending the mom-to-be off with a heart full of love and a room full of laughter?

How to Clean, Sanitize, and Store Baby Feeding Bottles
For new parents and caregivers, cleaning and washing baby feeding bottles is an essential step in maintaining proper hygiene for the baby. It helps in preventing the growth of bacteria and other contaminants, which ensures the safety of your baby. Cleaning baby feeding bottles is a crucial task that needs to be performed regularly since, with time, baby bottles can get dirty and contaminated. Thus, it is important to follow proper cleaning procedures. Whether you're using them for formula milk or expressed breast milk, keeping these bottles clean is crucial for your baby's health. However, do not worry; this guide is designed to make the process as simple and stress-free as possible.
Choosing the Right Feeding Bottle
Before we dive into cleaning, let's talk about selecting the right feeding bottle for your baby. Not all bottles are created equal and finding the perfect one can save you a lot of time and hassle down the line.

Look for Easy-to-Clean Designs
An ultra-wide neck design is something to consider when choosing a bottle. This feature makes it easier to clean the bottle by hand, ensuring that you can reach all parts of the bottle without the need for special brushes or tools. Bottles with fewer parts are also easier to clean and reassemble.
Consider Dishwasher Safety
If you have a dishwasher, you have to ensure that your chosen bottle should be dishwasher-safe. This can significantly streamline the cleaning process. However, it's still important to occasionally deep-clean bottles by hand to ensure that no residue or milk build-up is left behind.
Mimic Breastfeeding
When selecting the perfect baby feeding bottle for your little one, especially for breastfeeding infants, finding a bottle that closely mimics breastfeeding can make a significant difference. Opt for bottles whose nipple design is specifically crafted to replicate the breastfeeding experience. This design promotes a seamless transition from breast to bottle, making it easier for your baby to adapt without confusion or refusal.
Cleaning Baby Feeding Bottles: Step-by-Step
Now, let's break down the process and understand how to clean your baby's feeding bottles. It's not as daunting as it might seem!
-
Preparation
- Rinse Immediately: After feeding, rinse the bottle with cold water to remove any leftover milk before it dries.
- Disassemble the Bottle: Take apart all the pieces of the bottle - the bottle itself, nipple, cap, and any valves or rings.
-
Hand Washing
- Soak in Hot Soapy Water: Use a basin or a clean sink filled with hot water and add some mild dish cleaner. Soak the bottle parts for a few minutes.
- Scrub Thoroughly: Use a clean bottle brush to scrub inside the bottle and nipple. The ultra-wide neck design of some bottles makes this step easier. Be sure to clean every nook and cranny, paying special attention to the base of the nipple.
- Rinse Well: Rinse each part under clean running water to ensure all soap residue is removed.
-
Drying
-
- Air Dry: Place all washed and rinsed bottle parts on a clean drying rack or towel in an area free from dust and touching surfaces.
Sanitising Baby Feeding Bottles
While washing with hot, soapy water is sufficient for daily cleaning, sterilizing your baby's bottles can offer extra protection, especially for newborns or babies with weaker immune systems.
- Boiling
Place bottle parts in a large pot, cover them with water, and boil for 5 minutes.
-
Steam Sanitising
Use a microwave or electric steam sanitiser according to the manufacturer's instructions.
Once the bottles are dry, reassemble them to prevent any contamination from dust or pests. Store the clean bottles in a clean, dry cabinet until they are ready to be used again.
Cleaning your baby's feeding bottles might seem like a daunting task, but with the right tools and a bit of knowledge, it can become a quick and simple part of your routine. Remember, a well-chosen bottle can make this task easier, so consider options with an ultra-wide neck design for hassle-free cleaning. With these tips, you'll ensure that your baby's feeding bottles are always clean, safe, and ready for use.

Dealing with Cradle Cap: Causes, Treatment Options, and P...
Becoming a parent brings many firsts - your baby’s first smile, first bath, and sometimes, first skin concerns too. One common surprise you may notice is the cradle cap. If you spot flakes on your baby’s scalp, don’t worry; it’s a harmless and very common condition.
Cradle cap in newborns often happens due to leftover maternal hormones that can lead to excess oil production on your baby’s scalp. You may see yellow or white scales, but the good news is they aren’t painful, and they’re not contagious.
While a cradle cap can make your baby’s scalp look flaky, you can manage it easily. In this article, you’ll learn what cradle cap is, why it happens, how to treat it, and what steps you can take to keep your little one’s scalp healthy and comfortable.
What is a Cradle Cap in Babies?
Cradle cap, scientifically termed seborrheic dermatitis in babies, is a prevalent skin condition that commonly manifests in infants within the initial months of their lives. This condition is typically identified by the presence of yellowish, greasy scales on a baby's scalp, making it look like a mild case of dandruff. Though the cradle cap isn't itchy or painful for your baby, it can understandably cause concern for parents.
A cradle cap newborn flare-up tends to make its debut in the first few weeks of a baby's life and can persist for a few months. While it might be a bit unsightly, the good news is that cradle cap in infants is temporary and usually resolves on its own without causing any long-term issues for your little one.
Cradle cap tends to impact approximately 10 per cent of newborns within their first month, with the prevalence soaring to 70 per cent by the time they reach three months old. Surprisingly, the occurrence diminishes significantly to only 7 per cent in infants aged 1 to 2 years. For many parents, spotting cradle cap newborn symptoms can be unsettling at first. The reassuring news is that it's a very common and harmless condition that usually resolves on its own.
How Long Does Cradle Cap Last? What Parents Can Expect
Cradle cap shows up early, often getting better naturally. For some babies, it might last weeks. For others, a few months. Babies usually outgrow this condition by their first birthday. It really helps parents to know that a cradle cap is only temporary, so they can be patient and still follow gentle care.

Causes of Cradle Cap
Sebum Overproduction
One of the causes of cradle cap is the excess production of sebum, a natural oil that the skin produces. In newborns, the sebaceous glands can go into overdrive, resulting in an excess of this oily substance. When dead skin cells mix with sebum, it results in the characteristic yellowish crust seen in the cradle cap.
Fungal Involvement
The presence of a fungus known as Malassezia, which resembles yeast, is considered to be another factor that contributes to the problem. While harmless, this fungus can exacerbate the production of sebum and contribute to the development of cradle cap.
Environmental Factors
Environmental elements, such as alterations in weather conditions or exposure to abrasive shampoos, can contribute to the onset or exacerbation of cradle cap. Parents can take proactive measures to handle the condition by comprehending and addressing these factors effectively.
Cradle Cap vs Baby Eczema
A cradle cap newborn diagnosis is common, but many parents worry that the flakes on their baby’s scalp could be eczema rather than cradle cap. While the two can look similar at first glance, they behave quite differently. Cradle cap, a form of seborrheic dermatitis in babies, usually appears on oilier areas such as the scalp, eyebrows, and behind the ears, showing up as greasy, yellowish scales that aren’t itchy or uncomfortable for your baby.
Baby eczema, on the other hand, tends to be dry, red, and itchy and can appear anywhere on the body, including the cheeks, arms, and legs. Unlike cradle cap, eczema often causes visible irritation and may leave your little one fussy or uncomfortable. If you’re ever unsure which one your baby has, a quick check with your pediatrician can offer clarity and help you choose the right care routine for their delicate skin.
Treatment Options for Cradle Cap
Gentle Shampooing
A simple yet effective way to manage a cradle cap is through gentle shampooing. Opt for a mild, organic baby shampoo, using warm water to soften the scales before gently massaging and rinsing the scalp.
Scalp Massage
Gently massaging your baby's scalp with your fingers using a natural hair massage oil can help loosen and lift the scales. Massage with a natural and baby-friendly hair oil not only aids in the removal of cradle caps but also provides a comforting and bonding experience for both parent and baby.
Brushing or Combing
Using a soft baby brush or comb, carefully brush through the baby's hair to remove loose scales. Be gentle to avoid irritating the scalp, and always ensure the tools are clean and safe for your little one. The Sunehere Resham baby comb is a wooden hairbrush made of natural elements with super-soft bristles for infants and kids. It gets rid of the cradle cap and releases natural oils in the baby’s hair and skin without damaging or scratching.
Natural Remedies
For parents who prefer natural remedies, applying a small amount of coconut oil or almond oil to the affected areas before washing can help soften and loosen the scales. Always test a small patch to ensure your baby doesn't have any adverse reactions.
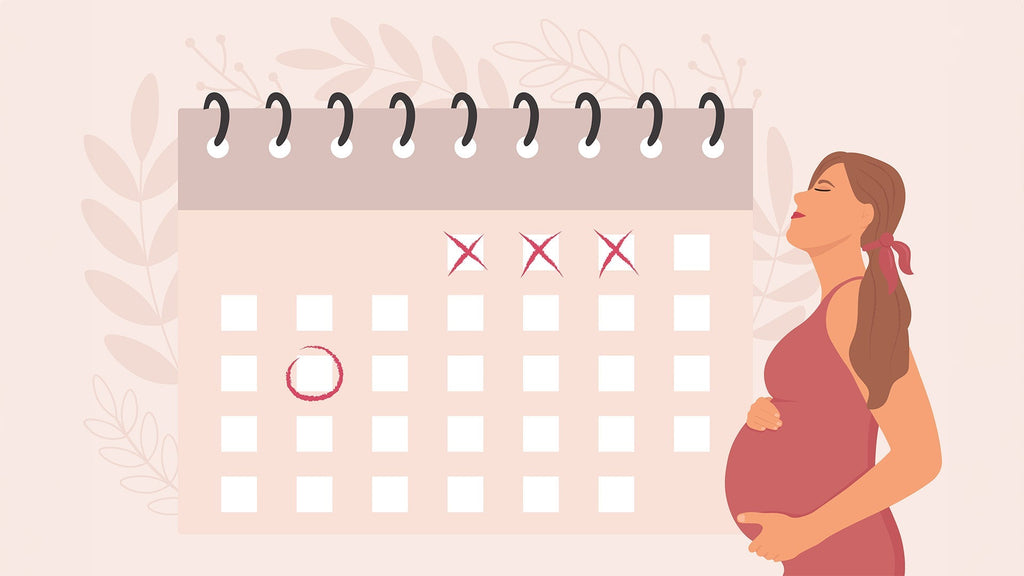
How to Use a Pregnancy Calculator to Track Your Pregnancy...
Finding out you're pregnant is such an exciting moment, full of joy—and, let’s face it, many questions! One of the first things you'll probably want to know is how far along you are and when your little one will make their grand entrance. That's where a pregnancy calculator comes in super handy. It's an easy-to-use tool that helps you track your pregnancy week by week so you can get a better sense of your journey. Let's break down how to use a pregnancy calculator and what you can expect as the weeks pass by!
What Is a Pregnancy Calculator?
A pregnancy calculator is a simple tool—whether digital or manual—that helps you estimate your due date and track your pregnancy progress. It works by using the first day of your last menstrual period (LMP) or the date of conception to calculate how many weeks pregnant you are. Since most pregnancies last about 40 weeks, the calculator gives you a general timeline of what to expect throughout your pregnancy.
The Baby Forest pregnancy calculator is a great way for expectant mothers to keep track of what's going on inside their bodies and how their babies are growing each week.
How to Use a Pregnancy Conception Calculator
Using the Baby Forest pregnancy calculator is super easy! Here's a quick step-by-step guide to help you out:

Know your dates –
The most common method is entering the first day of your last menstrual period (LMP). If you know your exact conception date, that works, too, but LMP tends to be more reliable.
Enter the information –
Simply input the dates into the calculator. If you're using an app or website, it'll do the math for you in seconds!
Get your estimated due date –
The pregnancy calculator will give you an estimated due date (EDD), which is when your baby is most likely to arrive. Just remember, only about 5% of babies are born exactly on their due date.
Track your pregnancy week by week –
The calculator will also show how far along you are and what changes to expect in both your body and your baby’s development.
That's it! With just a couple of clicks, you'll have an estimated timeline for your pregnancy journey.
Pregnancy Week-by-Week Tracking with a Calculator
One of the most exciting parts of pregnancy is watching your baby grow. A pregnancy calculator allows you to follow along week by week. Here's what you can expect:
- Weeks 1-4: Your baby is still a tiny bundle of cells, and implantation is happening. You might not even realize you're pregnant yet!
- Weeks 5-8: Major organs begin to develop, and you may start experiencing morning sickness and fatigue.
- Weeks 9-12: Your baby is about the size of a plum, and you might be able to hear the heartbeat at a doctor's visit.
- Weeks 13-16: Hello, second trimester! Your energy levels might return, and your baby is growing rapidly.
- Weeks 17-20: You may feel your baby's first kicks! An anatomy scan around week 20 gives a detailed look at their development.
- Weeks 21-24: Your baby is developing a sleep cycle, and their tiny features are becoming more defined.
- Weeks 25-28: The third trimester begins! Your baby is practicing breathing, and you might notice stronger movements.
- Weeks 29-32: Your baby is gaining weight fast, and you may start experiencing Braxton Hicks contractions.
- Weeks 33-36: Your baby is getting into position for birth, and you might feel more discomfort as your belly grows.
- Weeks 37-40: Almost there! Your baby is fully developed and could arrive anytime now.
A pregnancy calculator makes tracking these changes fun and informative, giving you a better idea of what's happening inside your body each week.
Additional Features: Some Pregnancy Calculators Offer
While basic pregnancy calculators give you an estimated due date and current week, some advanced calculators and apps offer additional features:
- Weight gain tracker: Helps you monitor healthy pregnancy weight gain.
- Baby size comparison: Tells you what fruit or vegetable your baby's size compares to each week.
- Symptom guide: Offers insights on common pregnancy symptoms based on your current week.
- Kick counter: Helps you track baby movements in the third trimester.
- Contraction timer: Useful for timing contractions as labour approaches.
These extra features can make pregnancy tracking more interactive and informative, helping you stay prepared every step of the way.
Benefits of Using a Pregnancy Calculator
There are so many reasons why a pregnancy calculator is a great tool for expectant parents:
- Easy tracking – It makes tracking your pregnancy a breeze, so you don't have to worry about complicated calculations.
- Better health monitoring – It keeps you aware of important pregnancy milestones and when to schedule check-ups.
- Emotional connection – Watching your baby grow week by week makes the whole experience feel more real and exciting!
- Reduces anxiety – Understanding what's normal each week helps ease your worries and boosts your confidence throughout your pregnancy journey.
When to Consult a Doctor for More Accurate Pregnancy Tracking
While pregnancy calculators are super helpful, they aren't a substitute for professional medical advice. You should reach out to your doctor if:
- You have irregular periods, which can make it tricky to calculate your due date accurately.
- You're unsure of your last menstrual period (LMP) or conception date.
- You have a history of pregnancy complications and need closer monitoring.
- Your doctor suggests an ultrasound for more precise dating.
Ultrasound scans, usually done around 8-12 weeks, provide the most accurate estimate of your baby's age and due date. Your doctor can also offer guidance on prenatal care and nutrition and address any concerns you may have along the way.
Conclusion
A pregnancy calculator is a simple yet powerful tool that helps you track your pregnancy week by week. It gives you a sneak peek into your baby's growth, helps you plan ahead, and adds a little extra excitement to your journey to parenthood. While it's a great starting point, always consult your doctor for the most accurate tracking and personalized advice.
Pregnancy is such a beautiful experience, with something new happening every week. Whether it's hearing your baby's first heartbeat, feeling that tiny kick, or preparing for delivery, a pregnancy calculator helps you stay informed and connected to your little one. So, go ahead—enter your details and start tracking this incredible journey!

How to Track Your Pregnancy Weight Gain with a Calculator
Pregnancy is such an exciting and beautiful journey, isn't it? There are so many changes happening, some that you can see coming and others that might take you by surprise. One of the biggest changes is how your body transforms – especially when it comes to weight gain.
It's totally normal but tracking it can help you stay on top of things and ensure you're on the right track. The good news is, it doesn't have to be stressful! With a pregnancy weight gain calculator, you can easily keep an eye on your progress and feel confident that everything is going as it should.
Why Pregnancy Weight Gain Matters
You might be asking yourself, "Why should I track my weight gain during pregnancy?" Well, it's not just about the number on the scale. It’s really about making sure your body is doing what it needs to support both your health and your growing baby.
Gaining the right amount of weight is key because it helps provide the energy and nutrients your baby needs to grow – like building the placenta and increasing blood volume. Plus, it ensures you have the right reserves for labor and recovery, so you're ready for the big day! It’s all about giving your baby the best start and taking care of yourself, too.
What Is a Pregnancy Weight Gain Calculator?
A pregnancy weight gain calculator is a super helpful tool to keep track of your weight during pregnancy. It looks at a few key things, like your pre-pregnancy weight, your body mass index (BMI), and how far along you are in your pregnancy.
That information gives you guidelines on how much weight you should gain during each trimester. The goal isn't to hit a specific number exactly but to stay within a healthy range that's just right for you and your baby. It's all about making sure you're on the right track without stressing over the details!
How to Use a Pregnancy Weight Gain Calculator
Using a Baby Forest pregnancy weight gain calculator is pretty simple – just enter a few details, and you're good to go! Here's a quick guide to walk you through it:

1. Enter Your Pre-Pregnancy Weight: The calculator will use this to figure out your BMI and set a baseline for how much weight you should gain.
2. Provide Your Height: This helps calculate your BMI more accurately and gives you a better idea of your healthy weight range.
3. Input Your Current Week of Pregnancy: The calculator adjusts for each trimester, so it'll give you a tailored suggestion based on where you are in your pregnancy.
Once you've entered this info, the calculator will show you a suggested weight gain range. For example, if your BMI is in the normal range, it might suggest gaining between 25-35 pounds. But keep in mind, this can vary depending on things like whether you're carrying twins or if you were overweight before pregnancy.
How Much Weight Should You Gain During Pregnancy?
The amount of weight you should gain during pregnancy really depends on a few factors, especially your starting weight. Here are some general guidelines to give you an idea:
- Underweight (BMI less than 18.5): If you were underweight before pregnancy, you might need to gain between 28 and 40 pounds.
- Healthy weight (BMI between 18.5 and 24.9): For those with a healthy weight, the recommended range is usually 25 to 35 pounds.
- Overweight (BMI between 25 and 29.9): If you were overweight before pregnancy, you might be advised to gain 15 to 25 pounds.
- Obese (BMI over 30): For those who were obese before pregnancy, a weight gain of 11 to 20 pounds might be recommended.
Remember, these are just general guidelines. Every pregnancy differs, and your doctor or healthcare provider will give you the best advice based on your unique health and circumstances.
Factors That Affect Pregnancy Weight Gain
It's important to remember that pregnancy weight gain isn't about sticking to a strict number from a calculator. Several things can influence how much weight you'll gain, including:
- Multiple Pregnancies: If you're carrying twins or multiples, you may need to gain more weight to support their growth and development.
- Activity Level: How active you were before and during pregnancy can affect how much weight you gain. Generally, staying active helps maintain a healthy weight, but it's important to balance activity with rest.
- Diet and Nutrition: A well-rounded, nutritious diet is key. Eating lots of fruits, veggies, lean proteins, and whole grains helps promote healthy weight gain for both you and your baby.
- Morning Sickness: Nausea and vomiting, especially in the first trimester, can make it hard to eat enough, which can affect weight gain.
- Health Conditions: If you have health conditions like gestational diabetes or thyroid disorders, they can influence weight gain and may require closer monitoring from your healthcare provider.
It’s all about balance, so focus on the bigger picture and work closely with your doctor to make sure everything stays on track.
Tips for Maintaining a Healthy Pregnancy Weight
Maintaining a healthy pregnancy weight doesn’t mean stressing over every pound. It's about being mindful and focusing on your overall well-being. Here are a few tips to help:
1. Eat Balanced Meals: Choose nutrient-rich foods like leafy greens, lean meats, and whole grains to nourish your body and baby.
2. Stay Hydrated: Drinking enough water is crucial for both you and your baby's health. Aim for at least 8-10 cups a day.
3. Listen to Your Body: It's normal to feel hungrier during pregnancy but try to focus on satisfying hunger with healthy foods rather than overeating.
4. Stay Active: Gentle exercises like walking, swimming, or prenatal yoga can help you stay healthy and feel great during pregnancy. Always check with your doctor before starting any exercise regimen.
5. Get Plenty of Rest: Adequate sleep helps your body recover and maintain energy levels, which can also contribute to maintaining a healthy weight.
When to Consult a Doctor About Pregnancy Weight Gain
If you notice a sudden increase or decrease in weight, it's important to reach out to your healthcare provider. Rapid weight gain, especially in the second or third trimester, could be a sign of conditions like pre-eclampsia, which requires attention.
On the flip side, not gaining enough weight might mean your baby isn't getting the nutrition they need, which is also something to address. Your doctor is the best person to offer guidance and ensure everything is progressing smoothly for both you and your little one. So, if anything feels off, don't hesitate to ask for help.
Conclusion
Tracking your pregnancy weight gain doesn't need to be a stressful experience. With the help of a pregnancy weight gain calculator, you can stay informed about your health and ensure you're supporting both yourself and your baby in the best possible way.
Just remember, every pregnancy is unique, so don't stress over the numbers – focus on eating well, staying active, and listening to your body. With the right approach, you can embrace this exciting time with confidence, knowing you're doing what's best for you and your growing little one.
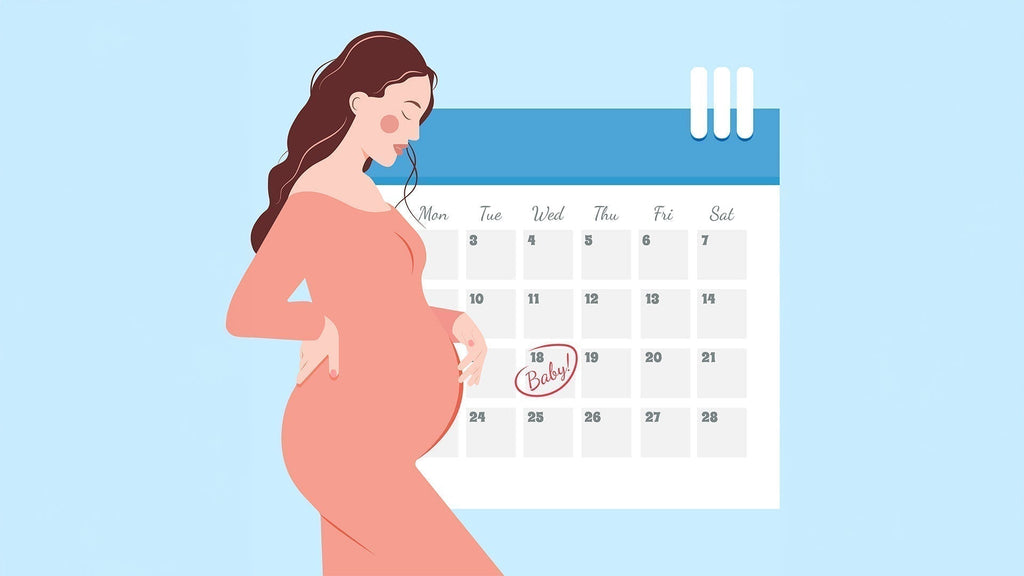
How to Use a Due Date Calculator: A Step-by-Step Guide
Pregnancy is such an exciting time—full of joy, surprises, and, yes, a few uncertainties along the way. One of the most common questions parents-to-be have is, "When will our baby arrive?" Knowing your due date is super important because it helps you plan for the big day. Luckily, thanks to due date calculators, figuring this out doesn't have to be complicated! In this guide, we'll show you exactly how to use one and help you understand your pregnancy timeline so you can feel a little more prepared for what's ahead.
What Is a Due Date Calculator?
A due date calculator is a handy tool that helps estimate when your little one might make their grand entrance. It works by using the first day of your last menstrual period (LMP) or your conception date, along with a formula that assumes a standard 28-day cycle. Keep in mind that it's not an exact science—your baby could arrive earlier or later than the estimate. But don't stress! The calculator gives you a solid starting point so you can start preparing for the big day.
Step-by-Step Guide to Using a Due Date Calculator
The Baby Forest Due Date Calculator can be incredibly helpful. Here’s how:

1. Know the Date of Your Last Period: First things first, you'll need to know the first day of your last menstrual period (LMP). This is usually how doctors estimate your due date. If you're not sure about your LMP, that's okay—just take your best guess, and the calculator can still give you a rough idea.
2. Enter the Information: Once you've got the date, simply plug it into a due date calculator. There are plenty of websites and apps that offer this feature, so you'll find one easily. Some calculators may also ask about the length of your menstrual cycle if it's different from the typical 28 days.
3. Hit Calculate: After entering all the details, hit the "Calculate" button. And just like that, you'll have an estimated due date!
4. Adjust for Cycle Length: If your cycle is longer or shorter than 28 days, the calculator will adjust your due date to reflect that. If you're using an app, it'll guide you through this step, so you don't have to worry about the details.
5. Stay Relaxed About the Result: Once the calculator gives you your due date, just remember—it's an estimate! Babies like to arrive on their own time, and most first-time pregnancies last between 38 and 42 weeks. So, don't stress if your little one comes a little earlier or later than expected.
How Accurate Is a Due Date Calculator?
While due date calculators are super helpful, they aren't perfect. The accuracy can depend on things like how regular your menstrual cycle is, how accurate the data you provide is, and when you ovulate. In fact, only about 5% of babies are born on their exact due date, so it's important not to get too attached to the date the calculator gives you.
These calculators typically assume you ovulate on day 14 of a standard 28-day cycle, but not everyone follows this pattern. If your cycle is shorter or longer than 28 days, the calculator will adjust your due date accordingly, but even then, it's still just an estimate. So, while it's a great tool, remember that your baby will arrive when they're ready!
Understanding Your Pregnancy Timeline Based on the Due Date
Once you have your due date, it's like a roadmap for your pregnancy journey. The typical 40 weeks are divided into three trimesters:
First Trimester (Weeks 1-12):
This is the very beginning, where your baby's organs are forming. You might feel super tired and even deal with morning sickness. It's not always the easiest, but it's a crucial time for your baby's growth.
Second Trimester (Weeks 13-26):
This is often referred to as the "honeymoon phase." You'll probably have more energy, and you may even start showing! Your baby's features will become more defined, and this is when many parents start to really feel that connection with their little ones.
Third Trimester (Weeks 27-40):
The final stretch! Your baby's organs are maturing, and they're getting ready for birth. As your baby grows, you might feel more uncomfortable, but hang in there—it won't be long until you meet your little one!
Knowing your due date makes it easier to track milestones and plan ahead for things like medical appointments, buying baby essentials, and getting your home ready for your new arrival. It helps you stay organized and calm so you're prepared when the big day finally arrives!
What to Do If Your Due Date Changes
Sometimes, your doctor might adjust your due date based on an ultrasound or other measurements. This usually happens if your baby's growth doesn't quite match the initial estimate. It's especially common if you're not sure about your LMP or if your cycles are irregular.
If your due date changes, don't stress! It doesn't mean anything is wrong—it just means you've got a more accurate idea of when your baby might arrive. Babies grow at their own pace, and doctors use these updates to make sure everything's on track. It's all part of the process, so take a deep breath and enjoy the journey!
When to Visit a Doctor for a More Accurate Due Date Estimate
If you're unsure about the details needed for your due date calculation or if your cycle is irregular, it's a great idea to check in with your doctor. They can help you get a more precise estimate, often using ultrasounds, which are a reliable way to date a pregnancy. Early ultrasounds, especially those done within the first 12 weeks, are particularly accurate when it comes to figuring out how far along you are.
Doctors can also keep an eye on your baby’s growth and adjust your due date if needed. So, if you're feeling uncertain or just want a clearer picture of your pregnancy timeline, don't hesitate to reach out to your doctor for some peace of mind. They're there to help guide you through every step of this exciting journey!
Conclusion
A due date calculator is a super handy tool that helps give you an idea of when your baby might make their debut. While it's not a guarantee, it's a great starting point for planning and preparing for your new arrival. Just keep in mind that babies don't always follow the schedule, so it's important to stay flexible and go with the flow.
Now that you know how to use a due date calculator, you can track your pregnancy journey with more confidence. It's an exciting time filled with growth and anticipation, so embrace each moment as you get ready to meet your little one. Your baby's arrival will be worth the wait!

What is the Hamburger Sign in Ultrasound? A Simple Guide ...
Finding out your baby’s gender is one of the most exciting moments in pregnancy! Some parents love the surprise, while others can't wait to know if it’s a boy or a girl. You might hear about the hamburger sign ultrasound if you're eager to find out. But what does that mean? And how accurate is it? Let's keep it simple and explain what to expect at your next scan!
What Is the Hamburger Sign in Ultrasound?
The hamburger sign ultrasound is a way doctors check if a baby is a girl during a scan. It gets its name because, on the ultrasound, the baby's genital area looks like a hamburger—three white lines representing the labia and clitoris (two buns and a patty in the middle!). This helps doctors tell the difference between a boy and a girl.
For a baby boy, the ultrasound shows a "turtle sign" instead, where the penis and scrotum are visible instead of the three lines. It may sound funny, but this method is a handy way to figure out your baby's gender early on!
When Can the Hamburger Sign Be Seen in an Ultrasound?
Expecting parents excited to know their baby's gender usually find out during the second trimester. The hamburger sign ultrasound is easiest to see between 18 and 22 weeks when the baby’s genitalia are fully developed and visible on the scan.
Sometimes, a skilled sonographer might spot it as early as 14 weeks, but early gender predictions aren't always accurate. That's why most doctors wait until at least 18 weeks to give a more reliable answer.
You Must Read: Chinese Gender Predictor
How Sonographers Use the Hamburger Sign to Identify a Baby Girl
During an ultrasound, the sonographer carefully checks the baby's lower body to see if they can spot the hamburger sign ultrasound. The baby’s position is important—if they're in the right spot, the technician looks for the three white lines that indicate a baby girl.
But sometimes, babies don't cooperate! If the view isn't clear, the technician might ask you to change positions, drink water, or walk around to help the baby move into a better spot.
How Accurate Is the Hamburger Sign in Predicting Gender?
The hamburger sign ultrasound is a common way to determine a baby’s gender, but it’s not always 100% accurate. The baby's position, ultrasound quality, and the technician's skill can all affect the results.
After 18 weeks, ultrasound gender predictions are about 95% accurate, but mistakes still happen. Sometimes, the umbilical cord or baby's fingers can look like genitalia, leading to confusion. That's why some parents confirm the results with other tests for extra certainty!
Other Methods Used to Determine Baby's Gender
Aside from the hamburger sign ultrasound, there are other ways doctors can determine a baby's gender:
- NIPT (Non-Invasive Prenatal Testing) is a blood test that can determine gender as early as 10 weeks with nearly 99% accuracy.
- Amniocentesis or CVS (Chorionic Villus Sampling) – These are invasive tests primarily used for genetic screening but can also reveal gender with certainty.
- 3D and 4D Ultrasounds – These advanced imaging techniques provide a clearer view of the baby's body, making gender identification easier.
- Old Wives' Tales and Gender Prediction Kits – While fun, these are not scientifically reliable. Methods like the shape of your belly or cravings are purely for entertainment!
Related Article: Old Wives’ Tales for Baby Gender Predictions
Conclusion
The hamburger sign ultrasound is a simple and helpful way for doctors to tell if you’re having a baby girl. While it's not 100% accurate, it gives a good early guess about your baby’s gender. If you're excited to find out, this method and other tests can give you a pretty clear idea.
But in the end, whether it's a boy or a girl, what truly matters is that your baby is healthy and growing well. Enjoy this special journey and have fun preparing for your little one's arrival!

What Is a Birth Flower? Find the Perfect Flower for Your ...
Discover the meaning behind birth flowers and find the perfect bloom for your birth month. Learn how each flower symbolizes personality, traits, and more.
Becoming a parent is an exciting journey, full of sweet surprises and little discoveries. One charming tradition you might love is the idea of birth flowers. Like birthstones, these are unique flowers linked to each month of the year, each carrying its unique meaning. They're perfect for thoughtful gifts or adding a meaningful touch to your home decor. Let's explore what birth flowers are all about, why they're so special, and how you can bring their beauty into your life.
What Is a Birth Flower?
A birth flower is simply a flower that represents the month you were born. Like birthstones or astrological signs, these blooms are nature's symbolic gift for each month. Each one has its special meaning, making it a lovely way to celebrate someone's unique personality, milestones, or even the arrival of a new family member.
The tradition of birth flowers goes back centuries, with ties to different cultures worldwide. They're a timeless, heartwarming way to connect with nature and honour life's important moments.
Birth Flowers by Month and Their Meanings
Here's a fun little guide to birth flowers for each month and the beautiful meanings they carry:

January – Carnation & Snowdrop:
Carnations symbolize love and admiration, while snowdrops represent hope and fresh beginnings.
February – Violet & Primrose:
Violets represent loyalty and faithfulness, while primroses represent young love.
March – Daffodil:
These bright yellow blooms represent rebirth and new beginnings.
April – Daisy & Sweet Pea:
Daisies symbolize purity and innocence, while sweet peas represent blissful pleasure.
May – Lily of the Valley & Hawthorn:
Lilies of the valley stand for sweetness and humility, while hawthorn blooms symbolize hope.
June – Rose & Honeysuckle:
Roses are classic symbols of love, and honeysuckles represent strong bonds.
July – Larkspur & Water Lily:
Larkspur symbolizes positivity and dignity, while water lilies represent peace and enlightenment.
August – Gladiolus & Poppy:
Gladiolus stands for strength and integrity, and poppies symbolize remembrance.
September – Aster Morning Glory:
Asters represent wisdom and love, while morning glories symbolize affection.
October – Marigold Cosmos:
Marigolds are linked to warmth and creativity, and the cosmos represents harmony.
November – Chrysanthemum:
These blooms symbolize friendship, joy, and optimism.
December – Narcissus & Holly:
Narcissus represents hope and good wishes, while Holly symbolizes protection and domestic happiness.
How to Use Birth Flowers in Gifting and Decor
Birth flowers can bring a special touch to so many parts of life. Here are some fun and meaningful ways to incorporate them:
Gifts for New Parents:
Surprise new parents with a bouquet featuring the baby's birth flower—a thoughtful and personal gesture.
Related Article: 5 Mindful Gift Ideas for New Parents
Baby Showers:
Use birth flowers in table centrepieces or floral decorations to create a charming and memorable baby shower theme.
Related Article: How to Plan the Perfect Baby Shower?
Nursery Decor:
Personalize your baby's room with wall art or prints featuring their birth flower.
Personal Keepsakes:
Think of pressed flower frames, jewellery, or custom artwork featuring your little one's birth flower.
Family Traditions:
Start a garden filled with birth flowers for each family member—a living, blooming family history right in your backyard!
Cultural and Historical Significance of Birth Flowers
Birth flowers have fascinating cultural and historical roots. Back in Victorian times, flowers were a way to communicate unspoken messages through "floriography,” or the language of flowers. Imagine expressing love, friendship, or even secret feelings simply through blooms!
Different cultures also attach their meanings to flowers. For example, in Japanese culture, cherry blossoms symbolize the fleeting beauty of life—reminding us to cherish every moment.
Different cultures also attach their meanings to flowers. For example, in Japanese culture, cherry blossoms symbolize the fleeting beauty of life—reminding us to cherish every moment.
How to Care for Your Birth Flower
If you've got a garden—or even just a few pots on your balcony—growing your birth flower can be a rewarding experience. Here are some simple care tips to help you get started:
Know Your Bloom's Needs:
Check whether your birth flower prefers soaking up the sun or hanging out in the shade.
Water Wisely:
Most flowers love well-drained soil, so ensure their roots aren't in water.
Fertilize Occasionally:
Boost your plant's health with organic fertiliser occasionally.
Prune Regularly:
Deadhead those spent blooms to keep your plant vibrant and encourage new growth.
Protect from Pests:
Look for pests and try natural solutions to keep them at bay. And if gardening isn't your thing, that's okay! Simply enjoying fresh or dried versions of your birth flower can still brighten your space and bring a touch of meaning to your day.
Conclusion
Birth flowers are a lovely way to add a personal and meaningful touch to life’s special moments. Whether you're gifting a thoughtful bouquet, decorating your home with floral art, or starting a new family tradition, these beautiful blooms carry heartfelt messages of love, hope, and joy.
As you navigate the adventure of parenthood, finding small ways to celebrate and connect with nature can make the journey even more magical. Why not discover your family's birth flowers and let them bloom in your life—whether in your garden, on your walls, or simply in your heart?

How to Give a Safe and Gentle Sponge Bath to Your Baby
A simple guide for new parents on giving a baby a sponge bath. Learn the right techniques and what supplies you'll need. Start with confidence!
Bringing your newborn home is such a special moment, but let’s be real—it also comes with a lot of “Wait, am I doing this right?” moments. One of those? Keeping your little one clean. Since newborn skin is super delicate and the umbilical cord stump needs time to heal, a full bath isn’t the best idea just yet. That’s where a gentle sponge bath procedure comes in!
If you’re feeling a little unsure, don’t worry—you’re not alone. Giving your baby a sponge bath is easier than you think, and we’ve got all the tips to help you do it safely and comfortably.
When Does a Baby Need a Sponge Bath?
Newborns don’t need a bath every day—in fact, too much bathing can dry out their delicate skin. That’s why a sponge bath procedure is the way to go until the umbilical cord stump naturally falls off (which usually happens within two weeks). If your baby has been circumcised, sponge baths are also the safest option since they help keep the healing area clean and dry.
Of course, babies have a knack for making adorable messes—whether it’s a milk spill, a diaper blowout, or just an extra sweaty nap. In those cases, a quick sponge bath is a lifesaver for freshening them up without a full soak.
Essential Supplies for a Baby Sponge Bath
Before you start, gather everything you’ll need. Babies can get cold quickly, so having everything within reach ensures a smooth process.
Here’s what you’ll need:
- A soft washcloth or natural sponge
- A basin of warm water (not too hot—around 98°F or 37°C is ideal)
- Gentle, fragrance-free baby soap (optional)
- A clean, soft towel
- A fresh diaper and clean clothes
- Cotton balls or pads (for cleaning the eyes and face)
Once you have all the essentials ready, it’s time to start the sponge bath procedure step by step.
Related Read - Ultimate Baby Bathing Checklist
Step-by-Step Guide to Giving a Sponge Bath

1. Choose a Warm, Comfortable Spot
Pick a safe, warm place for the bath, like a changing table, a padded surface, or even a bed with a waterproof mat underneath. Keep the room temperature cozy (around 75°F) to prevent your baby from getting chilly.
2. Undress Your Baby, but Keep Them Wrapped
Babies can feel exposed and cold quickly, so keep them wrapped in a soft towel and uncover only the parts you’re washing.
3. Start with the Face
Dip a cotton ball in warm water (no soap needed) and gently wipe each eye from the inner to the outer corner. Use a fresh cotton ball for each eye. Then, use a soft washcloth to clean the rest of the face, paying attention to the folds around the nose and mouth.
4. Wash the Neck, Hands, and Arms
Gently wipe around the neck, behind the ears, and under the chin where milk tends to collect. Move on to the hands and arms, carefully cleaning between tiny fingers.
5. Clean the Chest and Back
Using a damp, warm washcloth with a tiny amount of baby soap (if needed), wipe down the chest and back. Avoid scrubbing—gentle strokes are enough.
6. Wipe the Legs and Feet
Babies love to kick, so their legs and feet can get surprisingly dirty. Clean between the toes and make sure to dry them well.
7. Clean the Diaper Area Last
Always wash the diaper area last to avoid spreading bacteria. For girls, wipe front to back. For boys, gently clean the genital area without pulling back the foreskin (if uncircumcised).
8. Dry and Dress Your Baby
Pat your baby dry immediately with a soft towel, making sure to dry any skin folds. Then, dress them in a clean diaper and warm, comfy clothes.
Tips for Keeping Your Baby Comfortable During a Sponge Bath
- Keep talking to them! Your voice soothes your baby and makes bath time feel safe and familiar.
- Use gentle strokes. No need to scrub—soft dabs and wipes are all it takes.
- Keep baths short. 5 to 10 minutes is plenty.
- Warm the towel beforehand. A pre-warmed towel makes drying time extra cozy.
- Moisturize if needed. If your baby has dry skin, use a natural, fragrance-free baby lotion after the bath.
Common Mistakes to Avoid
- Using too much soap. A little goes a long way! Too much can dry out your baby’s skin.
- Letting the baby get too cold. Always keep them wrapped and only expose the part you’re washing.
- Skipping the skin folds. Milk, sweat, and lint can hide in the folds of the neck, thighs, and armpits.
- Rushing the process. Take your time. Making bath time calm and soothing can turn it into a bonding moment.
Related Read - Baby's First Bath: A Step-by-Step Skincare Guide for Newborns
When to Transition to a Regular Bath
Once your baby’s umbilical cord stump has fallen off and any circumcision has healed, it’s time to move on to a real bath! This usually happens around two to three weeks after birth. When that moment comes, stick to the same gentle approach—warm water, soft strokes, and keeping bath time short and sweet.
Conclusion
Giving your newborn a sponge bath procedure doesn’t have to be stressful. In fact, it’s a beautiful chance to bond with your little one. Just keep things warm, be extra gentle, and enjoy these snuggly, peaceful moments. Before you know it, your tiny newborn will be splashing around in the tub, so soak up every second while they’re this little!

Fertility Yoga for Beginners: A Step-by-Step Guide
Trying to conceive can be an emotional rollercoaster. The waiting, the stress, the well-meaning (but sometimes overwhelming) advice—it's a lot. If you're looking for a natural way to support your fertility and bring some calm into the process, fertility yoga might be just what you need. It's a gentle, mindful practice that helps melt away stress, improves blood flow to your reproductive organs, and brings a sense of balance to your body and mind.
The best part? You don't need to be a yoga pro to start. Yoga for conceiving is all about simple, nurturing movements that make you feel good—physically and emotionally. This guide will walk you through the basics so you can step onto your mat with confidence and start your journey with ease.
How Yoga Supports Fertility
You might be wondering—how exactly does yoga help with fertility? The benefits go beyond just stretching and relaxation.
Reduces Stress:
Stress is a big factor in fertility struggles. Yoga helps calm the nervous system, reducing cortisol levels and promoting a state of relaxation that's essential for conception.
Improves Blood Circulation:
Certain poses enhance blood flow to the reproductive organs, helping to nourish and support them.
Balances Hormones:
By stimulating the endocrine system, yoga can help regulate hormones crucial for ovulation and overall reproductive health.
Strengthens the Pelvic Area:
Many yoga poses target the hips, pelvis, and lower abdomen, creating a strong and supportive foundation for pregnancy.
Encourages Mind-Body Connection:
Yoga teaches you to be more in tune with your body, making it easier to recognize your natural cycles and fertility signals.
Best Time to Start Fertility Yoga
The short answer? Anytime! There's no right or wrong time to start, but if you're actively trying to conceive, incorporating yoga for conceiving into your routine before ovulation can be extra beneficial.
If you're undergoing fertility treatments, it's always a good idea to check with your doctor about when and how to practice. Some women find that gentle yoga works well throughout their entire cycle, while others prefer to adjust the intensity based on how they're feeling. Listen to your body, take it slow, and let yoga support you every step of the way!
Related Read - About Beej Sanskar
Essential Tips for Beginners
Starting something new can feel intimidating, but don't worry. Here are a few tips to ease into fertility yoga:
Keep It Gentle:
Fertility yoga is all about relaxation and connection. Avoid intense, high-impact yoga styles.
Breathe Deeply
Focus on slow, deep breaths. This helps reduce stress and increases oxygen flow to your reproductive organs.
Listen to Your Body:
If a pose feels uncomfortable, skip it. Yoga should feel good, not forceful.
Create a Calm Space:
Find a quiet spot where you feel at ease. A soft mat, dim lighting, and relaxing music can set the mood.
Stay Consistent:
Like anything, consistency matters. Aim for at least 3-4 sessions a week to see benefits.
Step-by-Step Fertility Yoga Routine
Here's a simple routine to get you started. These poses are gentle, effective, and beginner-friendly.

1. Butterfly Pose (Baddha Konasana)
-
Sit on the floor with your spine tall.
-
Bring the soles of your feet together, letting your knees drop outward.
-
Hold your feet and gently press your knees toward the floor.
-
Stay here for 3-5 minutes, breathing deeply.
Why it helps: It opens up the hips and increases circulation to the pelvic area.
2. Legs Up the Wall (Viparita Karani)
-
Lie on your back and extend your legs up against a wall.
-
Relax your arms by your sides and breathe deeply.
-
Hold for 5-10 minutes.
Why it helps: Encourages blood flow to the reproductive organs and promotes relaxation.
3. Child's Pose (Balasana)
-
Kneel on the floor and sit back on your heels.
-
Extend your arms forward and rest your forehead on the mat.
-
Breathe deeply and stay here for 3 minutes.
Why it helps: It releases tension in the lower back and hips and reduces stress.
4. Bridge Pose (Setu Bandhasana)
-
Lie on your back with your knees bent and feet flat on the floor.
-
Press your feet into the mat and lift your hips up.
-
Hold for 30 seconds, then lower slowly.
Why it helps: Stimulates the pelvic region and balances hormones.
5. Seated Forward Bend (Paschimottanasana)
-
Sit with legs extended forward.
-
Reach for your toes, folding over your legs.
-
Hold for 3 minutes while breathing deeply.
Why it helps: It improves blood circulation to the uterus and relieves stress.
Additional Lifestyle Tips to Boost Fertility
Along with yoga for conceiving, a few lifestyle changes can further support your journey:
Eat a Balanced Diet:
Focus on whole, nutrient-rich foods like leafy greens, nuts, seeds, and lean proteins.
Stay Hydrated:
Proper hydration supports overall reproductive health.
Get Enough Sleep:
Aim for 7-9 hours of quality sleep to keep hormones balanced.
Reduce Caffeine and Alcohol:
Both can interfere with hormone regulation and ovulation.
Practice Mindfulness:
Meditation and breathing exercises can further reduce stress and improve emotional well-being.
Precautions and When to Consult a Doctor
Fertility yoga is generally safe, but tuning into your body is key. If you have a medical condition, have had recent surgery, or are undergoing fertility treatments, it's always best to check with your doctor before starting.
And remember—yoga for conceiving should feel good, not painful. If any pose feels uncomfortable or causes strain, don't push through it. Modify, take a break, or switch to a gentler pose. Your body knows best, so let it guide you!
Conclusion
Fertility yoga is more than just movement—it's a way to nurture your body, mind, and fertility all at once. It melts away stress, boosts blood flow to your reproductive organs, and creates a positive, welcoming space for new life to grow.
By making yoga for conceiving a part of your routine—alongside a healthy lifestyle—you're giving yourself the best possible chance to embrace this beautiful journey. So, roll out your mat, take a deep breath, and trust the process. Your body is working with you every step of the way!